There is a particular satisfaction in completing a home improvement project with your own hands, and few projects deliver the visual impact of adding decorative beams to a ceiling. The transformation is immediate and dramatic—a room that felt flat and unremarkable becomes warm, textured, and architecturally rich. The good news for DIY enthusiasts is that installing polyurethane faux wood beams is well within the capabilities of a competent homeowner with basic tools and a methodical approach. This guide takes you through the entire process, from initial planning to the final finishing touches, with honest advice about what works and where to exercise caution.
Planning and Preparation
Before purchasing a single beam, spend an afternoon on thorough planning. The time invested here will pay dividends during installation, preventing mistakes that are expensive and time-consuming to correct.
Begin by measuring the ceiling space precisely. Use a steel measuring tape rather than a cloth tape for accuracy, and record all measurements in millimeters. Measure the total length that each beam must span, and determine the desired spacing between parallel beams. A simple grid drawn on graph paper with the room dimensions and beam layout gives you a visual reference that makes ordering materials much easier.
Identify the location of ceiling joists using a stud finder. Mark each joist location with a pencil line across the ceiling, extending at least 100 millimeters down the wall at each end. These marks are critical—they tell you exactly where your mounting hardware can be secured. If the joist spacing is too wide for your planned beam spacing, you may need to add supplemental blocking between joists before installing beams.
Next, calculate the quantity of materials needed. For each beam, you will need the beam itself, mounting hardware (ledger boards or steel brackets), screws or bolts for fastening, construction adhesive, and finishing materials. Order a few percent extra—typically 5 to 10 percent—of beam length to account for measurement errors and any cuts that do not go perfectly to plan.
Choose an installation pattern. Parallel beams running perpendicular to exposed joists create a clean, organized look that works in most rooms. Crossing beams arranged in a grid or intersecting pattern produce a more dramatic coffered ceiling effect and work best in larger rooms with higher ceilings. A single accent beam placed perpendicular to the ceiling joists above a fireplace or dining table creates a bold focal point with minimal material cost.
Tools and Materials Checklist
Gathering all tools and materials before beginning prevents frustrating interruptions mid-installation. The list below covers everything needed for a standard faux beam installation on a flat drywall ceiling.
Essential tools include a powered drill with a clutch setting, a mitre saw or hand saw for cutting beams to length, a spirit level (at least 1,200 millimeters long for checking beam alignment), a tape measure, a stud finder, a caulking gun for adhesive, a hammer, and a socket wrench set for tightening lag bolts. For measuring and marking, gather pencils, a chalk line, a framing square, and masking tape.
Mounting materials include wooden ledger boards—typically 50 by 100 millimeters or 50 by 150 millimeters dimensional lumber cut to match the beam width—lag bolts or structural screws long enough to penetrate at least 50 millimeters into ceiling joists, and construction-grade polyurethane adhesive. Spackling compound, matching stain or paint, and fine sandpaper complete the finishing supplies.
If you are installing beams across a span exceeding 2,400 millimeters, consider requesting the supplier to cut the beams with factory-prepared mounting blocks bonded to the interior surface. These factory-installed reinforcements distribute fastener loads more evenly than field-installed mounting points and reduce the risk of localized damage at the attachment locations.

Installing Mounting Hardware
The mounting hardware is the structural backbone of the installation, and it must be rock solid. A beam that shifts or sags over time due to inadequate mounting is not merely an aesthetic problem—it can crack the finish, create gaps, and eventually require complete reinstallation.
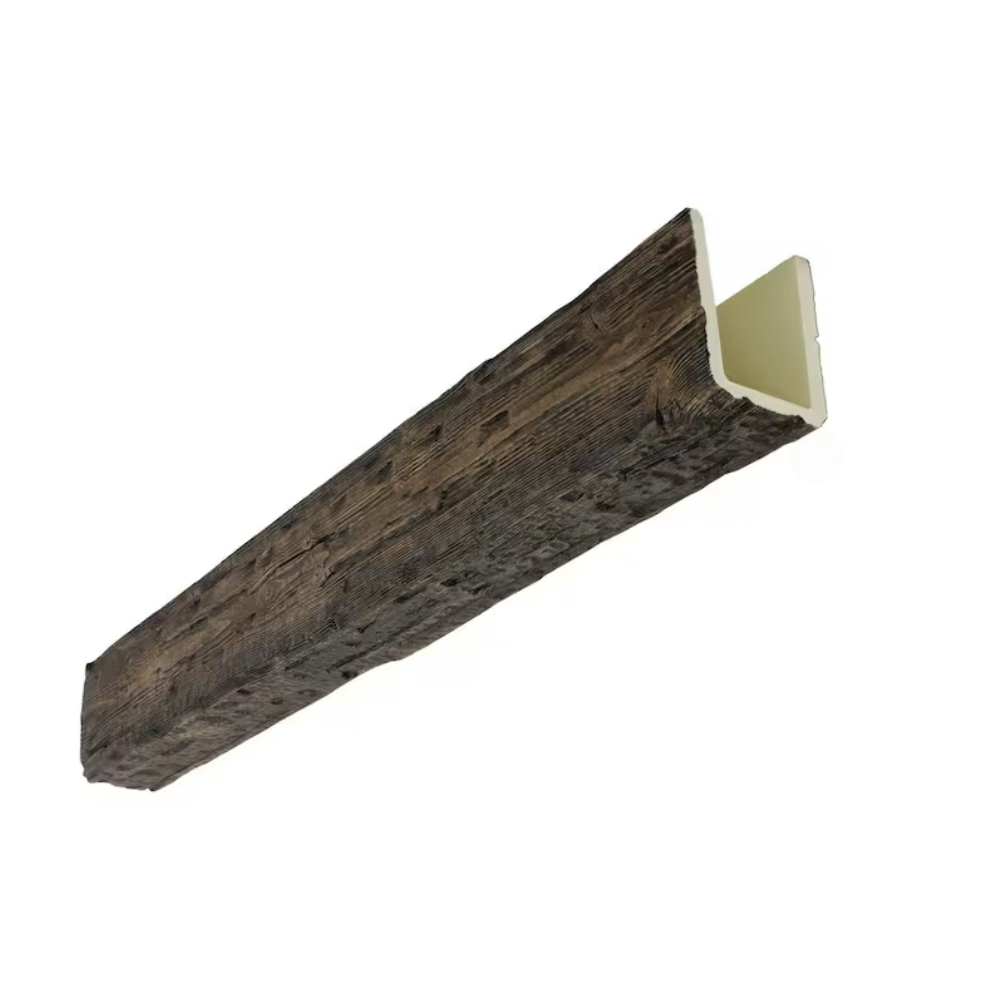
Begin by cutting the ledger boards to length. The ledger should be the same width as the interior cavity of the beam and long enough to span across two or more ceiling joists for maximum support. If the joist spacing does not align with the planned beam position, install cross-blocking between adjacent joists to create a solid mounting point. Cut the blocking from 50 by 100 millimeter lumber to fit snugly between joists, secure it with screws driven at an angle through the blocking into the joists, and verify with a level that the top of the blocking is flush with the bottom of the joists.
Position the ledger board against the ceiling along your marked line, keeping it level. Drive pilot holes through the ledger into the ceiling structure, then insert and tighten lag bolts or structural screws. The fastener heads should be recessed slightly below the surface of the ledger so they do not interfere with the beam seating against the ledger. Apply a continuous bead of construction adhesive along the top surface of the ledger where it will contact the beam.
For beams running perpendicular to joists, the ledger approach is ideal. For beams running parallel to joists, angle brackets or C-channel hangers attached to the sides of the joists provide a secure mounting point. Some installers use a combination of ledger boards at the ends and center support with bracket-style attachments at intermediate points.
Placing and Securing the Beams
With mounting hardware in place and the adhesive applied to the ledger, you are ready to position the first beam. Enlist a helper for this step if possible. A second person makes alignment faster and more accurate, and it reduces the risk of the beam being dropped or damaged during placement.
Lift the beam into position, aligning one end with your reference marks on the wall. Lower the beam onto the ledger, ensuring it seats fully and evenly. Check the alignment with your spirit level—the beam should be perfectly horizontal in all directions. Make any adjustments before the adhesive begins to set.
Once the beam is positioned, secure it with screws driven through the web of the beam into the ledger below. Countersink the screws slightly below the beam surface using a countersink bit, then fill the holes with spackling compound. Allow the compound to dry, sand it smooth, and apply matching stain or paint. The screw locations should be invisible after finishing.
Repeat the mounting process for each subsequent beam, maintaining consistent spacing throughout. Use a spacer jig cut from plywood to the exact desired gap width between beams—this ensures uniform spacing across the entire installation and speeds the process considerably. A chalk line extended across the ceiling from end to end provides a visual reference for keeping beams aligned in the perpendicular direction.
For beams that must be joined end to end to achieve a longer span, cut the beam ends at 45 degrees using a mitre saw for a clean, professional-looking joint. Apply adhesive to both cut surfaces, bring them together, and secure the joint with screws driven through the web into the mounting surface behind. Conceal the joint with a decorative trim piece cut from matching polyurethane molding, bonded in place with construction adhesive.
Finishing and Detailing
With all beams in place, the finishing stage addresses the details that elevate the installation from functional to polished. End caps, corner joints, and trim pieces transform a collection of individual beams into a cohesive architectural feature.
End caps are available from most beam suppliers as matching molded pieces that slip over or bond to the cut ends of beams at wall terminations. They create a clean, finished appearance and protect the vulnerable end grain from moisture and impact. Apply a small bead of construction adhesive to the end of the beam, slip the cap into position, and hold it in place with painter's tape until the adhesive sets.
Where beams intersect or cross, the joint can be finished with decorative polyurethane trim molding cut to create the appearance of traditional timber joinery. A simple butt joint covered with a triangular trim strip creates the look of a birdsmouth joint. More elaborate joinery appearances can be achieved with compound miter cuts and additional decorative elements.
Inspect the entire installation under good lighting, looking for any gaps between beams and the ceiling, any areas where mounting hardware may be visible, and any scratches or marks from the installation process. Touch up all areas requiring stain or paint, feathering the edges carefully so the repair blends invisibly with the surrounding surface.
Stand back and view the completed installation from the doorway of the room. This perspective shows the overall effect more accurately than close-up inspection and reveals any areas where the alignment or spacing looks inconsistent from a normal viewing distance.
A successful DIY faux wood beam installation rewards you every day you walk into the room. With careful planning, solid mounting, and attention to finishing details, the result will look professionally installed and provide years of maintenance-free enjoyment.
Technical References
ASTM standards cited in every specification
Test Data
Lab results from internal testing program
Updated 2026
Reviewed against current product specs


