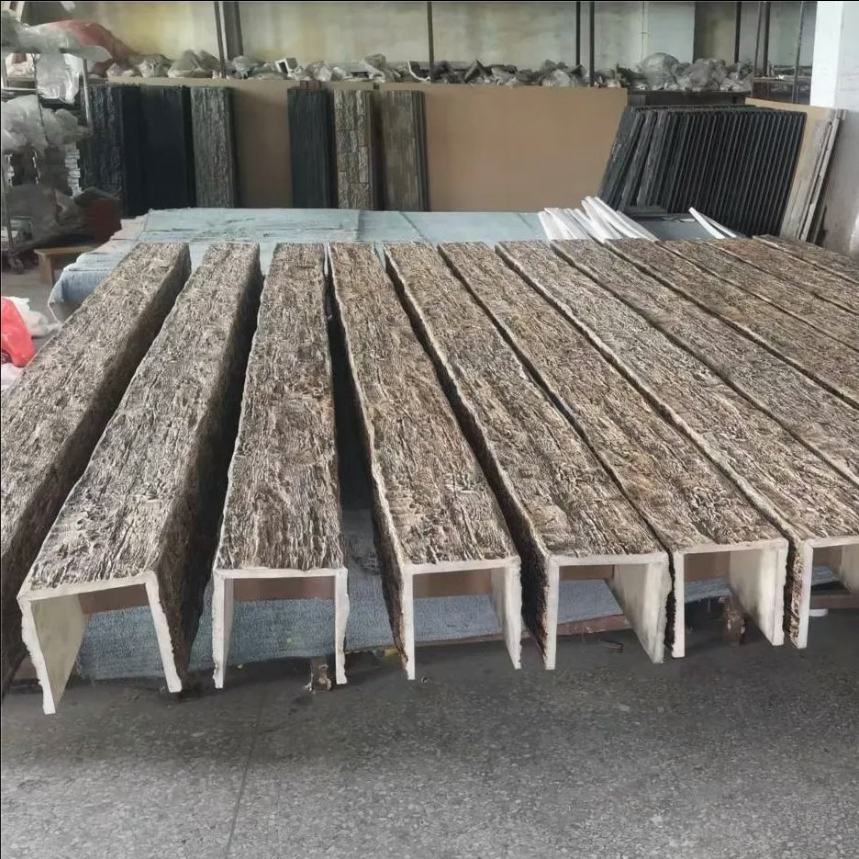
Wrapping a structural beam used to mean either living with the steel or lumber as it was, or committing to a multi-day drywall project that would leave the room under construction for the better part of a week. Shell style PU faux wood beams changed that equation. A U-shaped polyurethane casing slides over the existing beam, screws into the framing above, and presents a finished timber appearance in a single working day. The renovation moves from a construction project to a finishing project, and the disruption to the household is minimal.
The shell style has been around for decades in various forms, but the modern PU version is far more convincing than its predecessors. The molded texture is deeper, the color palettes are more varied, and the closed-cell foam resists the kind of damage that used to plague older foam wraps. For homeowners planning a beam wrap renovation, shell style PU casings are usually the most practical option.

Why Shell Wraps Work So Well
The shell approach solves several problems that have plagued beam renovation for decades. Drywall boxes crack along the long seams, look obviously fabricated, and require skilled tapers to finish properly. Solid timber wraps are heavy, expensive, and require careful acclimation. Paint alone leaves the structural beam as the visual feature rather than hiding it.
A shell wrap combines the best of both alternatives. The pre-finished exterior looks like real timber because the texture and color are molded from real timber. The hollow interior accommodates the existing beam plus a small clearance gap for shimming and adjustment. The closed-cell foam core insulates the structural member from the interior environment and adds a small amount of thermal resistance.
Comparison With Other Wrapping Methods
Drywall wrapping requires framing the box, hanging the panels, taping and mudding the joints, sanding, priming, and painting. The labor cost alone for a 20-foot beam is significant, and the finished product will develop hairline cracks along the long seams within a year or two as the framing moves seasonally.
Solid timber wrapping produces the most authentic result but is expensive and heavy. A typical 20-foot solid oak wrap can weigh 200 pounds or more, which is a real structural concern in older homes where the framing was not designed for that load. Solid timber also requires ongoing maintenance to look good over time.
Shell style PU wrapping hits a sweet spot. It looks like timber, weighs a fraction of solid wood, installs in hours, and lasts for decades with minimal maintenance. For most residential renovation scenarios, it is the right answer.
Measuring for the Right Shell Size
The measurement process is the most important step in a beam wrap project. Get it wrong and the rest of the job is a fight.
Measuring Existing Beams
Steel I-beams are usually uniform along their length, but wood beams can vary. Measure the height and width of the beam at both ends and at the midpoint. Use the largest dimension as your guide for sizing the shell.
Add clearance in every direction. Most installers recommend at least a half inch of clearance on the height and width, and a full inch on the depth. That gives you room to slide the shell on, shim it level, and drive fasteners without forcing the fit. A tight fit looks impressive on paper and turns into a nightmare on the job site.
For beams that are not perfectly straight, look for the worst spot and size the shell to accommodate it. Trying to force a shell over a crowned or twisted wood beam will crack the foam or leave gaps that have to be filled and finished.
Accounting for Hardware and Brackets
Existing beams often have hardware attached to them that interferes with a clean wrap. Beam hangers, joist hangers, conduit clamps, sprinkler pipes, and electrical boxes all extend beyond the basic beam profile. Note the location and projection of every piece of hardware, and plan the wrap to clear them.
In some cases, the hardware has to be relocated before the wrap can go on. A sprinkler pipe that sits an inch below the bottom of the beam needs to be moved up or rerouted around the wrap. Electrical boxes have to be repositioned or extended so they sit flush with the new ceiling plane. These adjustments take time, but they have to be done before the shell can be installed.
Determining Shell Orientation
Shell wraps are typically three-sided boxes with an open top. The opening sits against the ceiling or against blocking above the beam. For installations where the shell is wrapping an exposed beam with open space above, the standard orientation is fine. For installations where the shell needs to close against a finished ceiling, look for shells with a flat top flange that can sit flush against the drywall.
Some manufacturers offer shells with a removable top section, which allows the installer to drop the shell over the beam from above. That orientation works well when there is access from above, but it requires the ceiling to be open during installation.
Installation Workflow
A shell wrap installation follows a predictable sequence. The order of operations matters, and skipping steps usually shows up in the finished result.
Step One: Site Preparation
Move furniture out of the work area and protect the floor with drop cloths. Pull down any fixtures that interfere with the wrap, including light fixtures, ceiling fans, and decorative items. Turn off power to any electrical circuits in the work area and verify with a tester before touching wires.
Inspect the existing beam for signs of damage. Rust on steel beams should be addressed with a wire brush and rust converter before the wrap goes on. Cracks or rot in wood beams should be evaluated by a structural engineer, especially if the beam is carrying significant load. A cosmetic wrap is not a fix for a structural problem.
Step Two: Blocking and Layout
Install solid blocking between the joists or rafters above the beam. The blocking provides a continuous fastening surface for the wrap and lets you adjust the elevation of the shell to match the surrounding ceiling. Use a laser level or a long straightedge to establish a consistent reference line for the top of the wrap.
Mark the location of every fastener on the shell before you lift it into place. Pre-marking prevents the awkward situation of trying to hold a heavy shell overhead while reaching for a pencil.
Step Three: Dry Fit
Lift the shell into place without fasteners and check the fit. The shell should slide over the existing beam with the planned clearance, sit at the correct elevation, and align with the reference line on both sides. If the fit is not right, do not force it. Lower the shell, adjust the blocking or the reference line, and try again.
Dry fitting also gives you a chance to identify any interference with hardware or adjacent construction. Better to find out now than after the fasteners are set.
Step Four: Fastening
With the shell held in position, drive fasteners through the side flanges into the blocking above. Work from one end to the other, checking the elevation as you go. Do not overdrive the fasteners; the foam will dimple if the head sinks more than a quarter inch below the surface.
Use stainless steel or coated fasteners in any application where moisture is a concern. For dry interior applications, standard coated screws are adequate.
Step Five: Joint and Seam Treatment
Fill any visible seams between sections with a flexible, paintable filler. Tool the filler smooth before it cures, then apply a light topcoat to match the surrounding finish. Pay particular attention to the joint between the shell and the ceiling. A bead of paintable caulk along the ceiling line creates a clean shadow and prevents the small gaps that always exist along that transition.

Handling Common Complications
Even a well-planned beam wrap project encounters surprises. Knowing how to handle the common ones saves time and frustration.
Out-of-Level Ceilings
Older homes often have ceilings that are not level. A wrap that follows the ceiling will be unlevel itself, which looks worse than a beam that does not quite meet the ceiling. In those cases, shim the wrap to a level elevation and leave a wider caulk joint at the ceiling line. The wider joint is much less noticeable than an unlevel beam.
Beams That Turn Corners
Most beams run in straight lines, but some turn a corner or change elevation. Outside corners require factory-mitered shells or careful field cuts. Inside corners are more forgiving and can be scribed to fit the irregular geometry. Plan extra time for these transitions and have the manufacturer produce matching corner pieces if possible.
Beams With Multiple Webs or Flanges
Heavy steel beams sometimes have cover plates, haunches, or stiffeners that change the cross-section at specific points. Measure at every transition and order shells that can accommodate the largest profile. Shims can fill the smaller sections, but the shell has to clear the largest one.

Finishing the Wrapped Beam
The last steps of a shell wrap installation are the ones that determine whether the finished result looks professional.
Touch-Up Painting
Most factory finishes match the surrounding trim closely, but touch-up paint is usually needed at joints, fasteners, and ceiling lines. Use a small artist brush for tight areas and a mini roller for larger surfaces. Feather the touch-up into the surrounding finish rather than leaving hard edges.
Lighting Integration
If the wrap will host recessed or surface-mounted lighting, install the fixtures before the final touch-up paint. Wire the fixtures, mount them to the wrap, and verify that they sit at the correct elevation. Then paint around them with a small brush to maintain a clean finish.
Final Inspection
Walk the full length of the wrap and inspect it from multiple angles. Look for uneven seams, dimpled fasteners, color variations, and gaps at the ceiling line. Address any issues before the furniture goes back and the room returns to daily use.
Shell style PU faux wood beams make beam wrapping renovation accessible to homeowners who would have balked at the cost and disruption of traditional methods. The result looks like solid timber, installs in a fraction of the time, and lasts for decades with minimal maintenance. For most residential beam wrap projects, there is no longer a good reason to consider anything else.
Technical References
ASTM standards cited in every specification
Test Data
Lab results from internal testing program
Updated 2026
Reviewed against current product specs


