
Hollow PU faux wood beams have become the default choice for homeowners who want ceiling beams but prefer to install them themselves. The hollow design solves the weight problem that makes solid timber projects impractical for DIY, and it creates an installation format that almost anyone can learn.
This guide covers the full installation process, from the moment the beam arrives through the final cleanup. It is written for the homeowner who wants a complete understanding of what the project involves before committing to it.
What Makes Hollow PU Beams DIY-Friendly
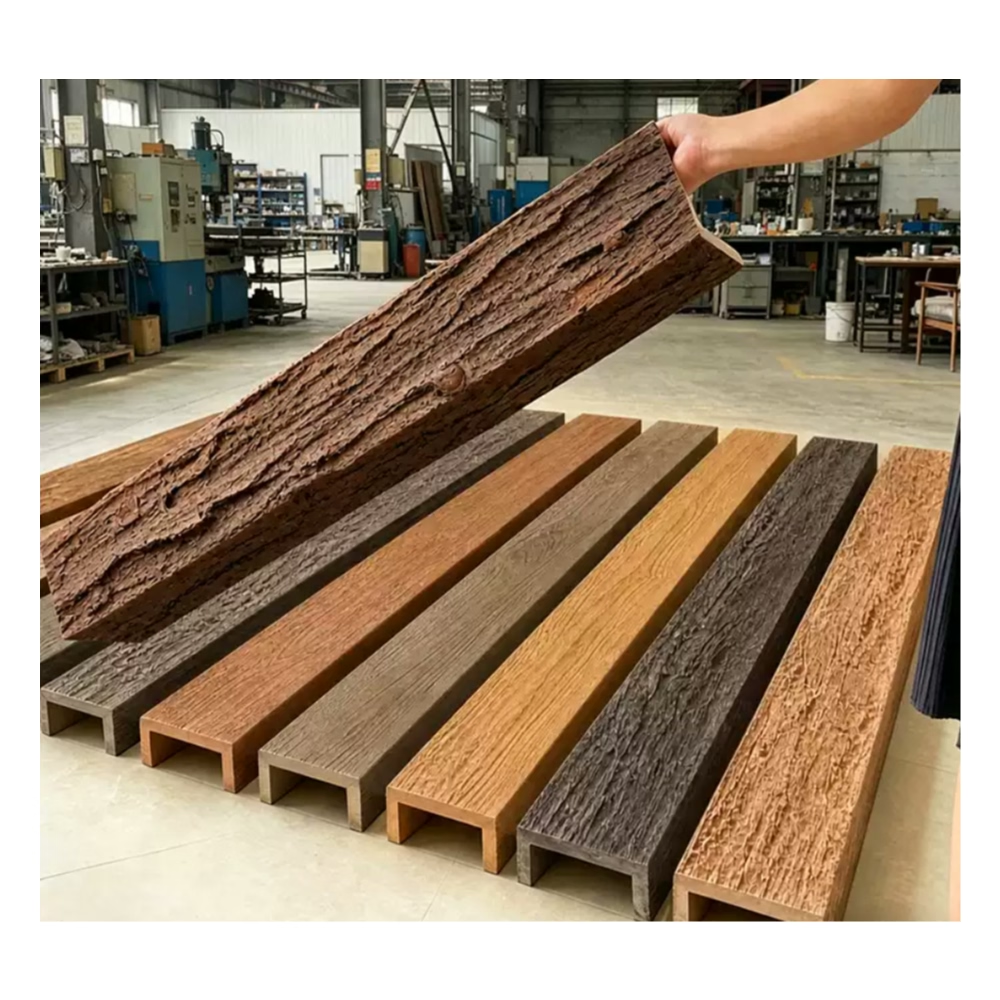
The hollow format is the result of deliberate design decisions by manufacturers who studied how homeowners approach beam projects. The shell is molded with three finished sides and one open side that wraps around a mounting block. The block provides the structural strength while the shell provides the appearance.
This division solves three problems that complicate solid timber installations. First, the shell is light enough for one person to handle during positioning. Second, the block can be installed and leveled separately from the shell, which catches errors early. Third, the open shell design accommodates minor variations in ceiling flatness without compromising the fit.
The DIY-friendly nature of the design extends to the supplies and tools. Most projects require only common tools, and the consumables are available at home improvement stores. There is no need for specialized equipment or hard-to-find materials.
The Anatomy of a Hollow Beam
The shell itself is a U-shaped piece of molded polyurethane with detailed surface textures that mimic wood grain. The open side faces the ceiling, with a small lip that rests against the ceiling surface when properly installed.
The mounting block is typically a length of standard lumber sized to fit inside the shell with minimal clearance on the sides. The block is what attaches to the ceiling, and the shell attaches to the block. This two-piece system is the key to the DIY-friendly nature of the installation.
The dimensions of the shell and block are matched at the factory, so homeowners do not need to do any custom fitting. The standard sizes work with standard lumber dimensions, and the resulting installation looks proportional and substantial.
Planning and Preparation
The planning stage determines whether the project goes smoothly or becomes frustrating. For a hollow PU beam installation, the planning involves measuring the installation space, selecting appropriate beam dimensions, ordering the correct length, and gathering the necessary tools and materials.
Measurements should include the full span where the beam will run, along with notes about any features that might interfere with the beam. Light fixtures, ceiling fans, smoke detectors, and HVAC vents all need to be considered during planning, even if they will not directly intersect the beam.
Beam dimensions depend on the visual goals and the ceiling height. Wider beams create a stronger horizontal element but may overwhelm smaller rooms. Narrower beams feel lighter and work better in rooms with standard eight-foot ceilings.
The mounting blocks should be ordered at the same time as the beams to ensure they are available when needed. Standard two-by-six or two-by-eight lumber from a home center works for most residential installations, and it should be cut to length a day or two before installation to allow any warping to become apparent.
Tools and Materials Checklist
For a typical installation, the tools needed include a drill with appropriate bits, a four-foot level, a stud finder, a measuring tape, a pencil for marking, a circular saw or miter saw for cutting the block to length, safety glasses, and a ladder.
A laser level projected onto the wall near the beam's mounting location provides a convenient reference for verifying alignment during the installation. The laser is optional but significantly improves accuracy for long beams.
Materials include the hollow shells, the mounting blocks, construction adhesive, wood screws long enough to penetrate the joists by at least an inch and a half, and touch-up materials from the manufacturer. Painter's tape is useful for marking locations on the ceiling during layout.
Locating Ceiling Joists
The mounting blocks must be secured to ceiling joists for a solid installation. Drywall alone cannot hold the weight of a beam over time, even a hollow PU beam, so finding the joists is essential.
A stud finder identifies the general location of joists, but the reading should be confirmed with a small pilot hole before any screws are driven. A bent piece of wire inserted into the pilot hole provides tactile confirmation of the joist location.
The joist locations are marked on the ceiling with a pencil, and a chalk line is snapped between the marks to establish the mounting line for the block. For installations where the chalk line does not align with all joists, blocking between joists may be needed.
If the ceiling has multiple layers of drywall, texture, or paint, the stud finder may give inconsistent readings. In these cases, looking for clues like nail holes, electrical boxes, or trim attachment points helps narrow down the likely joist locations.
Working Around Difficult Ceilings
Some ceilings present challenges that require alternative approaches. Cathedral ceilings with exposed beams in the structure may provide built-in mounting locations for the new faux beams. Tray ceilings have perimeter framing that can serve as mounting points. Popcorn or heavily textured ceilings may need to be scraped before stud finding is reliable.
For ceilings where joists are inaccessible, such as those with concrete above, special anchors designed for ceiling mounting provide an alternative. These anchors are typically toggle bolts or specialty concrete anchors rated for the expected load.
Working with a structural engineer or experienced contractor is wise for unusual ceiling situations. The cost of a consultation is much less than the cost of an installation that fails.
Installing the Mounting Block
The mounting block is the structural foundation of the installation, and it must be installed correctly for the rest of the project to succeed. The block should run the full length of the beam, with the ends terminating at solid framing where possible.
The block is positioned along the chalk line and screwed into each joist it crosses. Two or three screws at each joist provide secure attachment, with the screws long enough to penetrate the joist by an inch and a half or more.
For joists that fall outside the desired beam location, additional blocking can be installed between the joists. This blocking is screwed into the joists on either side and provides a solid mounting point for the main block above it.
Once the block is mounted, a level is used to verify that it is straight. Any high spots are sanded down, and any low spots are shimmed with thin washers or pieces of cardboard. The block must be straight and level for the shell to fit properly.
Squaring the Ends
The ends of the mounting block should be square and flush with the planned termination point of the beam. For beams that end at walls, the block can extend slightly into the wall cavity where it will be hidden.
For beams that end at corners or transitions, the block should terminate at the exact point where the shell will end. Any overhang beyond this point creates an obstruction that affects the shell fit, while any shortfall leaves the shell unsupported at the end.
A square cut at the block's ends is typically made with a miter saw or a circular saw guided by a speed square. The cut does not need to be perfect since the block is hidden inside the shell, but a clean cut makes the dry-fitting process smoother.

Dry Fitting the Shell
Before any adhesive or fasteners are applied, the shell is dry-fit over the mounting block to confirm the fit. The shell should slide into place with light pressure and rest flush against the ceiling.
Any gaps between the shell and the ceiling indicate problems that need to be corrected. Common causes include an uneven ceiling surface, a slightly oversized block, or a shell that has been compressed during shipping.
Gaps smaller than an eighth of an inch can usually be ignored or filled with caulk during finishing. Larger gaps require adjustment to the block position or the ceiling surface. A sanding plane or scraper can quickly remove small high spots on the ceiling where the shell rests.
The dry fit also confirms that the shell's length is correct. If the shell extends past the desired termination point, it can be marked and trimmed before final installation. If the shell is too short, additional blocking or a different mounting approach is needed.
Verifying Alignment for Multiple Beams
For projects with multiple beams, the dry-fit stage is the right time to verify consistent spacing and parallel alignment. The first beam establishes the reference, and each subsequent beam should be measured from the same fixed point to maintain consistency.
A long straightedge or a string line stretched between the end beams provides a visual reference for checking alignment. Any beam that does not run parallel to the reference needs adjustment before final mounting.
Multiple-beam projects benefit from installing all the mounting blocks first, then dry-fitting all the shells before any final mounting. This approach allows the homeowner to see the entire array and make adjustments before committing to specific positions.
Final Installation
Once the dry fit is verified, the shell is removed to apply adhesive and prepare for final mounting. Construction adhesive is applied in continuous beads along the inside of the shell and along the contact surfaces of the mounting block.
The shell is then slid back into position over the block and pressed firmly against the ceiling. With the help of an assistant holding the shell in place, screws are driven at angles through the sides of the shell into the mounting block.
The angled screws are typically hidden by the shadow lines of the beam profile, making them nearly invisible from below. The screw heads can be filled with a small amount of matching wood filler if additional concealment is desired.
The adhesive provides additional holding power and prevents any squeaking or movement between the shell and the block over time. The combination of adhesive and screws creates a secure installation that should last for decades.
Final Adjustments and Finishing
With the shell secured, the final adjustments include verifying the alignment one more time, filling any visible screw holes, and installing end caps at any exposed terminations.
End caps are important for hollow beam installations because they cover the open end of the shell that would otherwise reveal the mounting block inside. The caps are typically glued in place with construction adhesive and finished to match the surrounding beam surface.
For beams that terminate against walls, the open end is hidden by the wall itself, and no end cap is needed. For beams that end in open space, the end caps provide the finishing touch that makes the installation look complete.
A final wipe-down with a damp microfiber cloth removes any fingerprints or adhesive residue from the installation process. The beam is ready to enjoy immediately, with no additional finishing required.
Common Beginner Concerns
Homeowners new to beam installation often have concerns about the difficulty of the project, the appearance of the result, and the long-term performance of the installation. Each concern is worth addressing directly.
The difficulty is manageable for anyone with basic handyman skills. The most challenging parts of the project are the joist location step and the alignment verification during dry fitting. Both are learned quickly and become routine with experience.
The appearance depends largely on the quality of the beams and the attention to detail during installation. Reputable manufacturers produce shells that look convincingly like solid timber when properly installed. Common appearance issues, such as visible seams at the corners, are addressed by careful alignment and finishing.
The long-term performance is excellent when the installation is done correctly. Hollow PU beams resist moisture, fading, and wear better than solid timber, and the lightweight nature of the material reduces stress on the ceiling structure. Homeowners can expect the installation to look good for decades with minimal maintenance.
Time and Cost Considerations
A typical hollow PU beam installation takes a homeowner between four and eight hours for a single beam, including preparation, block mounting, shell fitting, and finishing. Multiple beams take proportionally longer but benefit from efficiency gained during the first installation.
The cost of materials varies by beam size and quantity, but a typical residential project falls in a manageable range for most budgets. The tools needed are common household items or can be borrowed for the project. Professional installation is also affordable for those who prefer to hire the work done.
Compared to the visual impact of the finished installation, the time and cost investment delivers strong returns. Hollow PU beams consistently rank among the highest-impact, lowest-cost home improvement projects that homeowners can undertake.
Technical References
ASTM standards cited in every specification
Test Data
Lab results from internal testing program
Updated 2026
Reviewed against current product specs


