
A designer was working on a living room with high ceilings and a fireplace that felt visually orphaned against the wall. The space had good bones, but the fireplace was not the focal point it should have been. The solution was unexpected. Instead of changing the fireplace surround, the designer mounted a single curved faux timber beam on the wall above the mantel. The beam followed the curve of the arch above the fireplace and extended several feet on either side, framing the entire composition in a way that made the fireplace instantly become the room's focal point. That is the power of an accent beam. A single, well-placed piece can transform a wall in a way that no other decor element can match.
Why Wall-Mounted Beams Work
Most beams are associated with ceilings, but the design principle behind them applies to walls as well. A substantial architectural element, well placed and well finished, draws the eye and gives the wall a sense of purpose. Wall-mounted beams bring that principle to spaces where ceiling installation is impractical or unnecessary.
Curved profiles add another layer of design language. A curved beam on a wall suggests softness and movement, contrasting with the hard, flat surfaces around it. In a room with a lot of straight lines and angular geometry, a curved beam adds visual relief. In a room that already has organic shapes, a curved beam reinforces the existing vocabulary. The curve also creates opportunities for interesting shadow play as lighting conditions change throughout the day.
Common Applications
Wall-mounted accent beams show up in several recurring applications. Above a fireplace mantel, they frame the focal point and add architectural weight to the wall. Above a doorway or arch, they provide a transition detail that ties the wall to the surrounding ceiling. On a feature wall, they create a layered composition that reads as more designed than a flat painted wall. Behind a headboard in a bedroom, they introduce warmth and softness without requiring a full ceiling installation. And on a long blank wall, a series of curved beams can break up the expanse and create visual rhythm.
Each application benefits from a slightly different design approach. A beam above a fireplace should feel substantial and grounding. A beam above a doorway should feel transitional and decorative. A beam on a feature wall should feel like part of a larger composition. The right curve profile, finish, and mounting detail depend on the role the beam is meant to play.
Sizing and Proportion
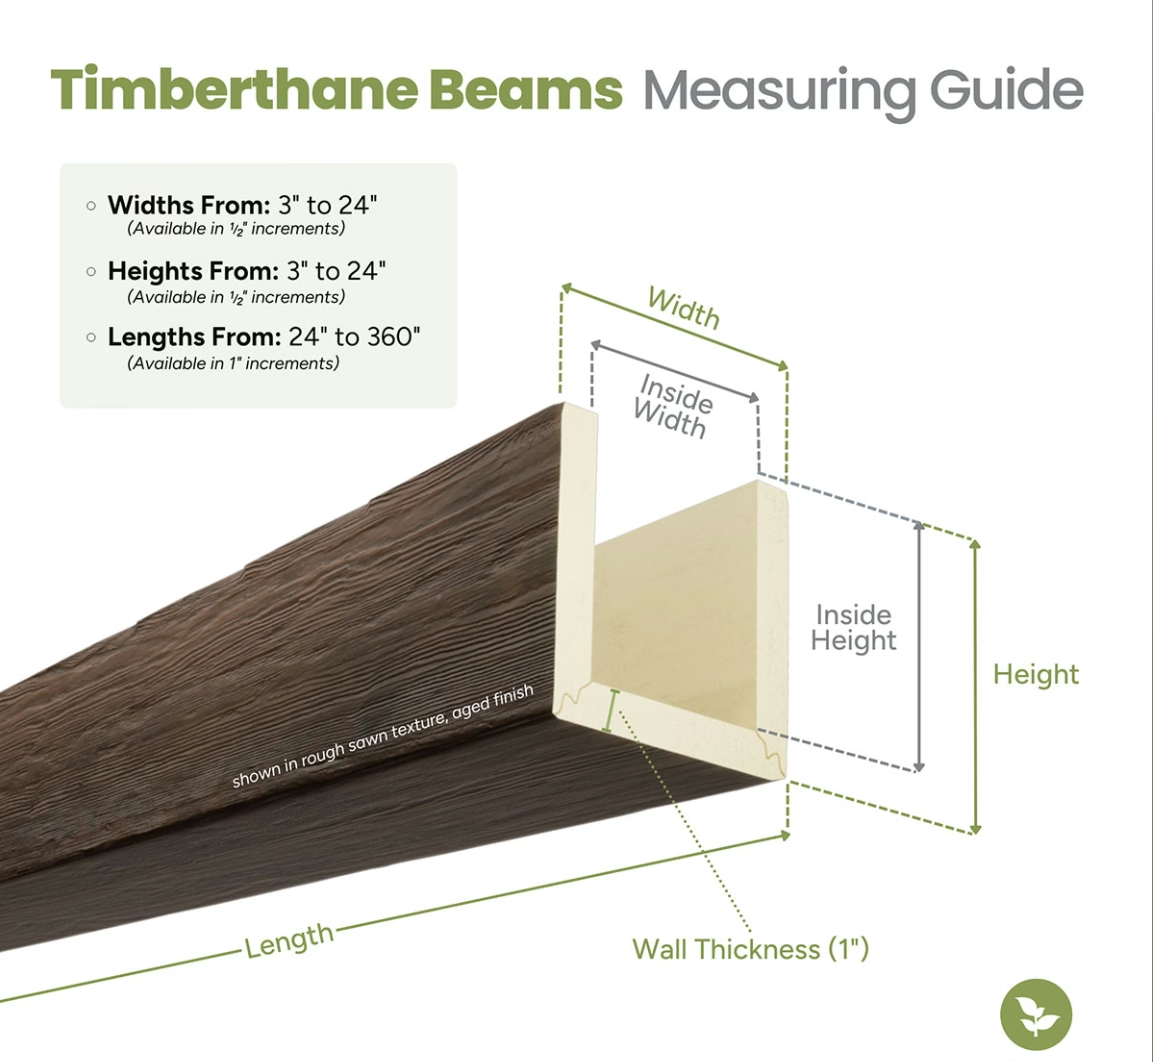
The size of a wall-mounted beam has to relate to the wall it sits on. A small beam on a large wall reads as timid and ineffective. A large beam on a small wall reads as overwhelming. The most successful accent beams are sized so that they occupy a meaningful portion of the wall without dominating it. A rough rule of thumb is that the beam should span at least half the width of the feature it is framing, but not more than the full width of the available wall space.
The depth of the beam matters too. A shallow beam reads as more decorative and less substantial. A deep beam reads as more architectural and grounding. Above a fireplace, a deeper beam often works better because it carries the visual weight of the mantel below. Above a doorway, a shallower beam often works better because it does not compete with the door frame.

Mounting Strategies for Wall Beams
Wall-mounted beams require secure attachment to the wall structure. Unlike ceiling beams, which benefit from gravity to keep them in place, wall-mounted beams are subject to leverage forces that can loosen their attachment over time if the mounting is not done correctly.
The mounting strategy depends on the wall construction. For wood-framed walls, the beam can be attached directly to the studs using heavy-duty wood screws through the back of the beam. For concrete or masonry walls, the mounting requires appropriate anchors or lead shields. For drywall over metal studs, blocking needs to be installed during construction or the mounting points need to land on the studs themselves.
Polyurethane faux timber beams are much lighter than solid timber, which simplifies the mounting significantly. A solid timber beam of the same dimensions might weigh hundreds of pounds and require multiple installers and heavy-duty mounting hardware. A polyurethane beam of the same dimensions usually weighs less than fifty pounds and can be mounted by a single installer with standard hardware.
Concealing the Mounting Hardware
The mounting hardware should be invisible once the beam is installed. This requires careful planning of the mounting points before installation begins. A small error in placement can leave visible hardware that undermines the finished appearance. The most common approach is to mount the beam through the back, with the screws or bolts passing through the beam material and into the wall structure. The entry points are then concealed by the beam's position against the wall, with no visible hardware on the front or sides.
For beams that will be mounted at a distance from the wall, such as those that wrap around an existing feature, the mounting hardware is necessarily more visible. In these cases, decorative brackets or corbels can serve both a structural and an aesthetic function. The hardware becomes part of the design rather than something to hide.
Handling Wall Irregularities
Walls are rarely perfectly flat. A wall-mounted beam that follows the wall contour precisely may look crooked if the wall itself is bowed or uneven. In most cases, shimming the mounting surface behind the beam corrects the issue and creates a flat, even installation. For severely uneven walls, breaking a long beam into shorter segments with intentional joints can work around the irregularity without trying to force a single straight beam to follow an imperfect wall.
Finish Coordination With Wall Decor
The finish on a wall-mounted beam has to relate to the wall surface and the surrounding decor. A dark walnut beam against a light plaster wall creates strong contrast and emphasizes the beam as a focal point. A medium oak beam against a similar-toned wall creates a more subtle effect where the beam blends into the wall while still providing texture and dimension.
The wall finish itself affects how the beam reads. A textured wall finish, such as plaster or grasscloth, provides visual interest that complements the beam's texture. A smooth painted wall provides a clean background that lets the beam stand out. A wallpapered wall with a busy pattern can compete with the beam for attention, so the patterns and beam profile should be coordinated to avoid visual chaos.
Coordinating With Art and Mirrors
Wall-mounted beams often share the wall with art, mirrors, or other decorative elements. The beam placement has to leave room for these elements without crowding them. A beam that runs directly through the center of where a large painting would hang is a layout error. A beam that provides a ledge or frame for a piece of art is a design success. The interaction between the beam and the surrounding wall decor is part of the composition, and it deserves the same attention as the beam itself.
Lighting Considerations
Wall-mounted beams benefit from thoughtful lighting integration. Sconces mounted on the beam, directional lighting aimed at the beam, or concealed uplighting that washes the wall behind the beam can all enhance the architectural effect. The lighting should support the beam's role in the room, whether that role is as a primary focal point or as a supporting element in a larger composition.
Wall-mounted curved polyurethane faux timber beams are one of the most versatile accent decor elements available to designers. They work in traditional rooms, modern rooms, and everything in between. They transform ordinary walls into focal points. And they do it all with a lightweight material that is practical to specify, easy to install, and durable enough to last for decades. For any room where the walls need a little something extra, an accent beam is worth serious consideration.
Technical References
ASTM standards cited in every specification
Test Data
Lab results from internal testing program
Updated 2026
Reviewed against current product specs


