
A focal point is the part of the room that anchors everything else. It might be a fireplace, a bed, a dining table, or simply a view out a window that the architecture was designed to frame. Eye-catching architectural accent PU beams give designers a way to draw the eye toward that focal point from above, using the ceiling itself to lead attention exactly where it belongs. They are not structural members and they don't pretend to be. Their job is purely visual, and they do it well.
How Focal Points Shape a Room
Every well-designed room has a hierarchy. Visitors enter and immediately understand what the room is for, what they are meant to look at, and where the action happens. That hierarchy is built through deliberate choices about proportion, finish, lighting, and architectural detail. Ceiling treatments are among the most powerful tools in that hierarchy, because the eye reads them before it processes anything else.
The Eye Reads Ceilings First
When someone walks into a room, their gaze goes up almost instinctively. The ceiling establishes the room's scale, signals its style, and provides context for everything below it. A ceiling with no architectural detail feels unfinished. A ceiling with deliberate architectural detail feels intentional. Accent beams in the right place help the ceiling say what the designer wants it to say.
Where Focal Points Naturally Fall
Most rooms have a natural focal point that the architecture already calls out. A fireplace has a mantel and a chimney breast. A bed has a headboard wall. A dining table sits in the center of the room with seating arranged around it. A picture window faces a view. The accent beam overhead reinforces these existing focal points, drawing attention to them and giving the eye permission to settle there.
Placement Patterns That Reinforce Focal Points
Architectural accent beams work best when their placement directly corresponds to the room's natural focal point. A few patterns show up again and again in successful designs.
Above the Fireplace Mantel
A beam above the fireplace mantel creates a horizontal frame around what is already the room's primary feature. The beam and the mantel work together as a paired gesture, with the fireplace visible between them. Designers often match the beam finish to the mantel material for a cohesive look, or contrast it deliberately to make both elements more visible.
Across a Headboard Wall
In a primary bedroom, a beam running the full width of the wall behind the bed reinforces the bed as the room's focal point. The beam can be centered above the headboard or positioned higher up the wall depending on ceiling height. Either way, it signals that the sleeping area is the room's anchor and gives the eye a confident line to follow.
Over a Dining Table or Kitchen Island
Dining tables and kitchen islands naturally gather people around them. A beam above them signals that intention, providing a visual canopy that pulls attention to the gathering space. Designers frequently use this placement to anchor open-plan layouts where the dining zone and living zone share a single large volume.
Along a Feature Wall
Rooms with art walls, gallery displays, or feature panels benefit from a beam running along the wall at ceiling height. The beam provides a confident horizontal line that frames the wall, gives the eye a place to rest, and ties the wall's contents to the rest of the room's architecture.

Why Polyurethane Is the Right Material for Accent Beams
Architectural accent beams have a specific role. They need to look right, install easily, and stay consistent over years of service. Polyurethane checks all those boxes without the complications of solid timber.
Lightweight Installation
Accent beams typically don't carry structural loads, which means the faux versions are plenty strong. Two installers can lift most accent beams into position without mechanical assistance, and the mounting hardware is straightforward blocking and bracket systems. Installation rarely takes more than a few hours per beam, even on larger projects.
Consistent Quality Across Multiple Beams
Homes with accent beams in several rooms often want the beams to look like a coordinated set. Polyurethane's manufacturing consistency makes that easy. Beams produced from the same mold carry the same profile and texture, and finishes applied in the factory match across multiple units. The result is a coherent design language throughout the home without the kind of variation that hand-finished solid timber often shows.
Cost-Effective Across Larger Projects
Custom solid timber beams in accent applications are expensive, particularly when multiple rooms are involved. Polyurethane beams deliver the same visual impact at a fraction of the cost, freeing up budget for other design elements. For developers and builders working on multiple homes with consistent specifications, that cost difference becomes significant.
Profiles and Finishes That Lead Attention
The profile and finish of an architectural accent beam determine how it reads in the room. Designers choose them based on the style of the space and the statement the beam is meant to make.
Profiles for Different Focal Point Styles
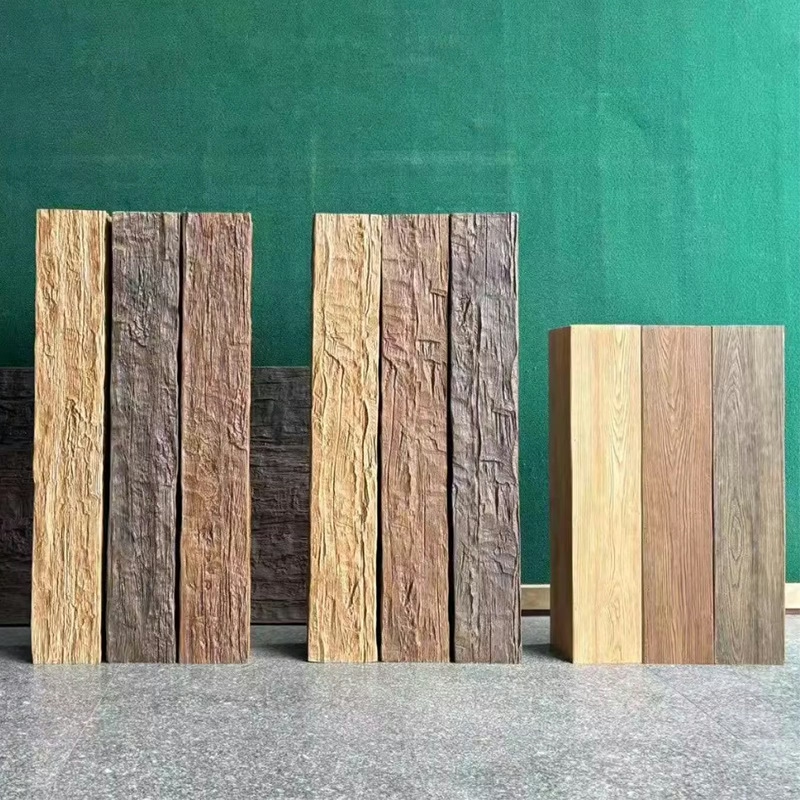
Smooth-planed profiles in mid-tone finishes work well above fireplaces with carved stone surrounds, where the beam supports rather than competes with the mantel. Heavily textured profiles in deep finishes work well in rooms with rustic material stories, where the beam is meant to feel like authentic reclaimed timber. Custom profiles developed from a sketch allow designers to create focal points that no catalog option can match.
Stain Tones That Pull the Eye
Deep walnut, ebony, and mahogany finishes pull the eye strongly toward the beam and the focal point beneath it. Mid-tone oak and pecan finishes lead attention more gently, providing direction without dominance. Pale and whitewashed finishes create a subtle shadow line that defines the focal point area without drawing focus to the beam itself.
Painted and Custom Finishes
Some accent beams are painted rather than stained. A crisp matte black beam against a white ceiling creates a graphic, contemporary statement that frames the focal point with editorial precision. Custom finishes matched to a specific color in the room's palette tie the beam to the broader design and make it feel like an integrated detail rather than an added element.

Coordinating Accent Beams with Lighting and Hardware
Accent beams often carry more than visual weight. Lighting, hardware, and decorative elements integrate with the beam to complete the focal point composition.
Pendants, Chandeliers, and Decorative Fixtures
A pendant or chandelier hanging from an accent beam above a focal point signals that the fixture is part of the composition. The beam becomes the mounting point for the lighting, and the lighting reinforces the beam's role as the room's anchor. Designers typically coordinate the beam's finish with the fixture's material to create a unified statement.
Recessed and Indirect Lighting
For more understated focal point treatments, recessed downlights or indirect LED strips integrated into the beam can illuminate the focal point without adding a visible fixture. The beam provides the architectural gesture, the lighting provides the emphasis, and the focal point itself gets the visual weight.
Concealed Blocking for Future Changes
Many designers specify accent beams with concealed blocking that supports heavier fixtures or future modifications. The beam looks the same, but its internal structure is engineered to accept a chandelier, fan, or hanging installation without modification. That flexibility makes the beam a long-term asset rather than a fixed decorative element.
Installation Best Practices for Accent Beams
Accent beam installation is straightforward but benefits from careful planning, particularly when multiple beams are involved.
Ceiling Preparation and Blocking
Mounting points are identified and blocking is installed before the beam goes up. For new construction, blocking is added during the framing stage. For renovations, blocking is screwed into ceiling joists or existing framing through small access holes that are patched after installation. The beam then mounts to the blocking with brackets or clips that are concealed once the beam is in place.
Spacing and Alignment for Multiple Beams
Homes with several accent beams in one room or across multiple rooms require careful measurement to ensure spacing and alignment are consistent. Designers often use laser levels, snap lines, or chalk lines to mark mounting positions across the ceiling before any beam is installed. The result is a series of beams that read as a coordinated composition rather than as isolated elements.
Coordination with Finishes and Fixtures
Accent beam installation typically follows ceiling painting and precedes fixture installation. The beam goes up after the ceiling is finished, painters cut in around the beam edges, and lighting fixtures are installed after the finish work is complete. That sequence keeps the beam undamaged and the surrounding finishes clean.
Sizing the Beam to the Focal Point
Accent beams work when they are scaled to both the room and the focal point they are framing. Too small and the beam disappears. Too large and it overwhelms the focal point rather than supporting it.
Width and Depth Relationships
A common guideline is to size the beam width at roughly one-third to one-half of the ceiling height, with depth matching or slightly exceeding width. Tall ceilings with a single dominant focal point benefit from wider, deeper beams that have the visual weight to anchor the room. Lower ceilings with smaller focal points call for slimmer beams that direct attention without dominating.
Length Relative to the Focal Point
The beam should extend beyond the focal point on both sides, providing visual support without crowding. For a fireplace, the beam typically runs wider than the mantel by 30 to 60 centimeters on each side. For a bed, the beam typically extends past the headboard by similar amounts. For a dining table, the beam length matches or slightly exceeds the table length to create a clear relationship between the overhead element and the furniture below.
A Beam That Directs the Eye
Eye-catching architectural accent PU beams earn their place in interior design by doing exactly what they promise: directing the eye to where the room wants attention. They work across styles, install efficiently, and hold their finish for decades. For designers building a clear hierarchy of focal points throughout a home, accent beams are one of the most effective tools available.
Technical References
ASTM standards cited in every specification
Test Data
Lab results from internal testing program
Updated 2026
Reviewed against current product specs


