
Genuine reclaimed barn timber is beautiful, expensive, and increasingly hard to source in long, clean lengths. A 200-year-old oak beam pulled from a Vermont barn may have come out of a barn that no longer stands, and the supply is finite. Polyurethane faux beams start with a controlled, consistent substrate and, with the right finishing work, can carry the same visual language: the silver-gray weathering on the outer face, the darker recesses in the grain, the worm tracks and nail stains that tell the story of a beam that has seen a century of seasons.
The catch is that "faux reclaimed" is one of the most difficult finishes to fake convincingly. Real barn timber has a complexity that comes from years of irregular weathering, and the eye picks up on a too-uniform, too-clean version immediately. The techniques below are the ones that consistently produce a finish that fools visitors, even on close inspection.
Start with the right beam profile
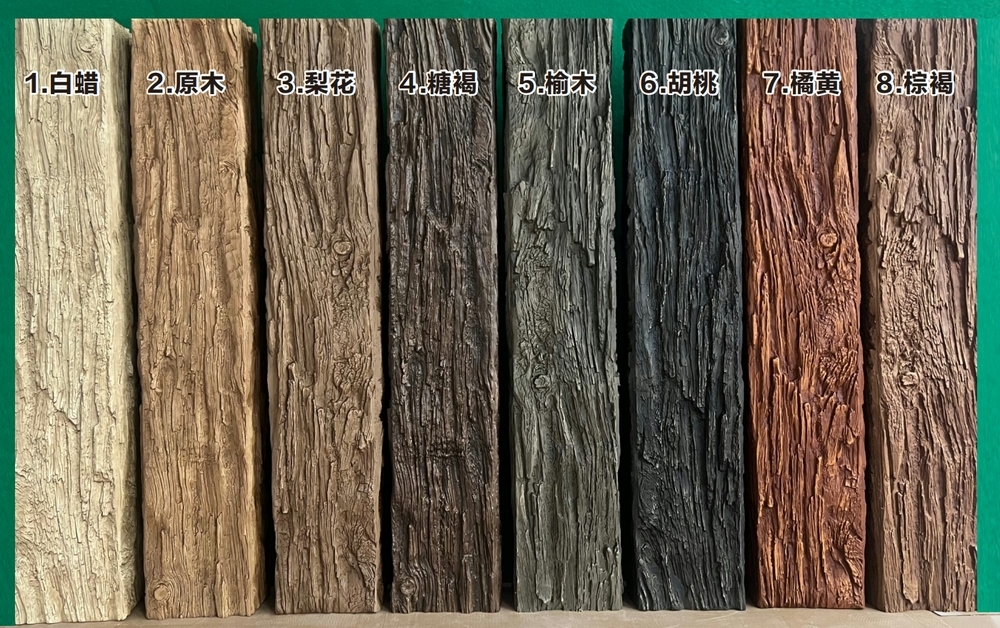
The substrate matters as much as the finish. A faux beam with a too-uniform grain pattern or perfectly sharp edges will look fake no matter how much glaze you layer on it. Choose a beam cast from a mold pulled from real reclaimed timber, with hand-hewn marks, irregular edges, and visible tool marks in the surface. The mold tells half the story before any finish is applied.
Within that, look for beams with deep embossed grain. Shallow grain reads as decorative molding rather than timber. A deep grain pattern catches glaze in the recesses and creates the shadow contrast that makes aged timber look aged rather than just brown.
Base color choices that set the tone
The base stain color sets the entire mood of the finished beam. Reclaimed barn timber falls into a few recognizable families, and choosing one before starting keeps the finish coherent.
The classic Vermont barn look is a warm honey brown base with heavy gray weathering on the outer face and edges. The deep grain shows darker brown where dirt and age have accumulated. The outer face is lighter and cooler, as if the sun has bleached it for decades.
The Midwestern wheat barn look is paler, with more pronounced gray and a subtle green tint in places where moisture and lichen once lived. The base is a tan or pale oak tone, and the weathering can be quite dramatic on the outer faces.
The tobacco barn look from the South is darker, with deep red-brown tones showing through where the gray has worn off at high-contact points like the corners. This is the most forgiving finish for a faux beam because the darker base hides small inconsistencies in the weathering layer.
The glazing process that creates depth
Once the base stain has dried, glaze is where reclaimed character happens. A glaze is essentially a slow-drying tinted medium that you wipe on, push into the recesses, and then wipe off the high points. The result is dark grain lines and lighter raised surfaces, which mimics exactly how real timber weathers.
Mix a dark brown or near-black glaze using artist's oil paint or a pre-mixed wood glaze tinted to the desired darkness. Apply it generously over a 2-foot section of beam. Use a soft rag to push the glaze into the deep grain, then wipe diagonally across the surface with a clean rag to remove the glaze from the raised areas. The grain pattern should darken dramatically while the raised surface stays close to the base color.
Work in sections small enough to control. A 6-foot section is usually the maximum length one person can glaze evenly before the glaze starts to set. If the glaze becomes tacky before you finish wiping, the working time is too long for the conditions; switch to a slower-drying glaze medium or work smaller sections.
Layering glaze for true depth
A single glaze pass looks acceptable. Two glaze passes, with slightly different tones, look far more convincing. The first pass uses a dark, cool-toned glaze that establishes the deepest grain shadows. After that dries, the second pass uses a warmer, slightly lighter glaze applied more sparingly and concentrated in the middle ranges of the grain pattern.
The double-glaze technique mimics how real timber accumulates different colors of weathering in different grain depths. The deepest grain gets the darkest, coolest shadow. The middle grain shows the base wood tone darkened by a century of oil and dirt. The raised grain stays close to the surface color, perhaps slightly muted by overall weathering.
Distressing techniques that do not look fake
The single biggest giveaway of a fake distressed beam is uniform distressing. Real barn timber has irregular weathering, with some areas heavily worn and other areas nearly pristine. A faux beam with distress marks at regular intervals across the surface looks machine-made, because it is.
Use a combination of techniques applied at random intervals and varying intensities. Drag a chain lightly across the beam in some sections to add small dents. Tap the surface with the rounded end of a screwdriver handle in other sections to mimic old impact marks. Use a wire brush to expose lighter wood fibers in the areas where you want the beam to look like it has been worn smooth by hand contact over decades.
Avoid using black paint or stain to mimic old nail holes. Real nail holes in barn timber are often stained dark by rust, but the stain radiates irregularly from the hole and the hole itself has rough, splintered edges. A drilled faux nail hole looks obviously fake. If the design calls for nail heads, use real decorative nails or cast iron nail heads rather than trying to fake the holes.
Adding the silver-gray patina
The silvery gray that distinguishes aged barn timber from newer brown timber comes from prolonged UV exposure and weathering. On a faux beam, that effect is created with a whitewash or pickling stain applied selectively to the outer faces and edges.
Mix a pickling stain by thinning white or pale gray acrylic paint 50/50 with water or a pickling medium. Apply it to the outer face of the beam with a rag, working in long strokes along the grain. Wipe most of it off, leaving the white-gray residue in the low spots and on the edges. The result is a surface that looks bleached by decades of sun while the deeper grain retains its darker character.
The key to a convincing patina is irregularity. Some sections of the beam face should have heavy white-gray weathering, others should have almost none, with smooth transitions between. Use a dry brush technique to add small patches of gray in unexpected places. A completely uniform gray wash looks like paint. An irregular application looks like weather.
Seal the finish for long-term durability
Once the finish is dry, seal it with a matte or satin water-based topcoat. The topcoat does two jobs. It locks in the layered finish so it does not smear or fade with cleaning. It also adds a tactile quality that mimics the dry, slightly rough surface of real aged timber.
A high-gloss topcoat is wrong for this finish. Aged barn timber is matte, with a soft sheen only where centuries of handling have burnished the surface. A satin or matte topcoat reads as authentically weathered; a gloss topcoat reads as a freshly finished piece of furniture.
Two thin coats are better than one thick coat. A thick coat can fill in the deep grain texture and undo the depth created by the glaze layers. Thin coats preserve the texture while adding protection.

Practical timeline and workspace setup
Plan on three to five days for the full finishing process, with drying time between steps. Day one is base stain application. Day two is the first glaze pass after the base dries overnight. Day three is the second glaze pass and distressing work. Day four is the pickling and weathering layer. Day five is the final topcoat after everything is fully dry.
The workspace should be ventilated and dust-free. Glaze and stain work in a garage or covered outdoor area with good airflow. Lay the beams on sawhorses at a comfortable working height. Working on the beams before they are mounted on the ceiling is dramatically easier than trying to finish them in place overhead.
Budget extra time for the inevitable section that needs to be redone. The first attempt at glazing often reveals that the glaze was too thick or too thin in places. A second pass on the trouble spots is part of the process, not a failure.
A well-finished faux reclaimed beam is genuinely hard to distinguish from the real thing once it is on the ceiling. The combination of a good substrate, layered glazes, irregular distressing, and a careful patina application produces a finish that reads as authentic even to people who work with reclaimed timber professionally. The savings over the cost of actual reclaimed beams, especially on long spans, can be substantial.
Technical References
ASTM standards cited in every specification
Test Data
Lab results from internal testing program
Updated 2026
Reviewed against current product specs


