The weekend renovation movement has fundamentally changed how Americans approach home improvement. What was once the domain of professional contractors has expanded to include a growing population of homeowners who confidently tackle projects ranging from bathroom tile installation to kitchen cabinet painting. This shift reflects both the accessibility of information through online tutorials and the development of consumer-friendly products that reduce the skill barrier for complex-looking results. Among these products, lightweight foam polyurethane faux beams stand out as particularly well-suited to the DIY market because they deliver high visual impact with minimal technical demands.
Traditional ceiling beam installation has always presented significant barriers to entry for non-professionals. Solid timber beams require at minimum two people to lift and position safely, often demand structural calculations to verify ceiling load capacity, and typically need specialized mounting hardware designed for heavy loads. These requirements effectively excluded most homeowners from genuine timber beam projects, reserving them for professional installations with appropriate budgets. Foam faux beams remove every one of these barriers, replacing them with a mounting process that a single person can complete using standard household tools and materials available at any hardware store.
The confidence boost that comes from a successful DIY installation should not be underestimated. Completing a ceiling beam project over a weekend provides a tangible achievement that transforms how homeowners view their own capabilities. The beams themselves become a daily reminder of what was accomplished, visible every time the room is entered and appreciated by family members and guests who notice the improvement. For many homeowners, the first successful beam installation leads directly to the next project, building skills and confidence through progressive challenge.
Tools and Preparation for a Smooth Installation
One of the most appealing aspects of foam beam installation is the modest tool requirement. A tape measure, pencil, level, drill or driver, stud finder, and handsaw or hacksaw for any cutting needed constitute the complete toolkit for most installations. No specialized equipment like lifts, clamps, or industrial adhesives is necessary, which means homeowners can complete the project without purchasing or renting anything beyond what they likely already own.
Before beginning, accurate measurements prevent wasted material and ensure proper fit. The installer should measure the ceiling span at multiple points to account for any variation in room dimensions, then mark the desired beam positions with painter's tape rather than pencil directly on the ceiling. Painter's tape allows for easy repositioning during the planning phase and leaves no residue after removal. Taking photographs of the planned layout from multiple angles provides a reference that helps when actually installing the beams, especially for complex patterns involving multiple beams at different angles.
Checking the ceiling for adequate mounting surface is an essential preparation step. The mounting brackets used for foam beams require attachment to solid framing, which means locating ceiling joists accurately matters more than it might for a decorative trim project. A stud finder simplifies this process, and marking joist positions with tape provides clear guidance when positioning bracket locations. In cases where joist spacing does not align with desired beam positions, homeowners can install blocking between joists to create mounting points in the exact locations needed.
Acclimating the beams to the room environment, while not always strictly necessary for polyurethane, helps ensure that the adhesive and mounting system perform optimally. Opening the beam packages and allowing the pieces to rest in the installation room for 24 to 48 hours lets any residual manufacturing moisture dissipate and allows the material to reach room temperature. This simple step takes no effort beyond opening boxes and can prevent issues with adhesive setting that might occur if beams are significantly cooler or warmer than the room.

Step-by-Step Installation Process
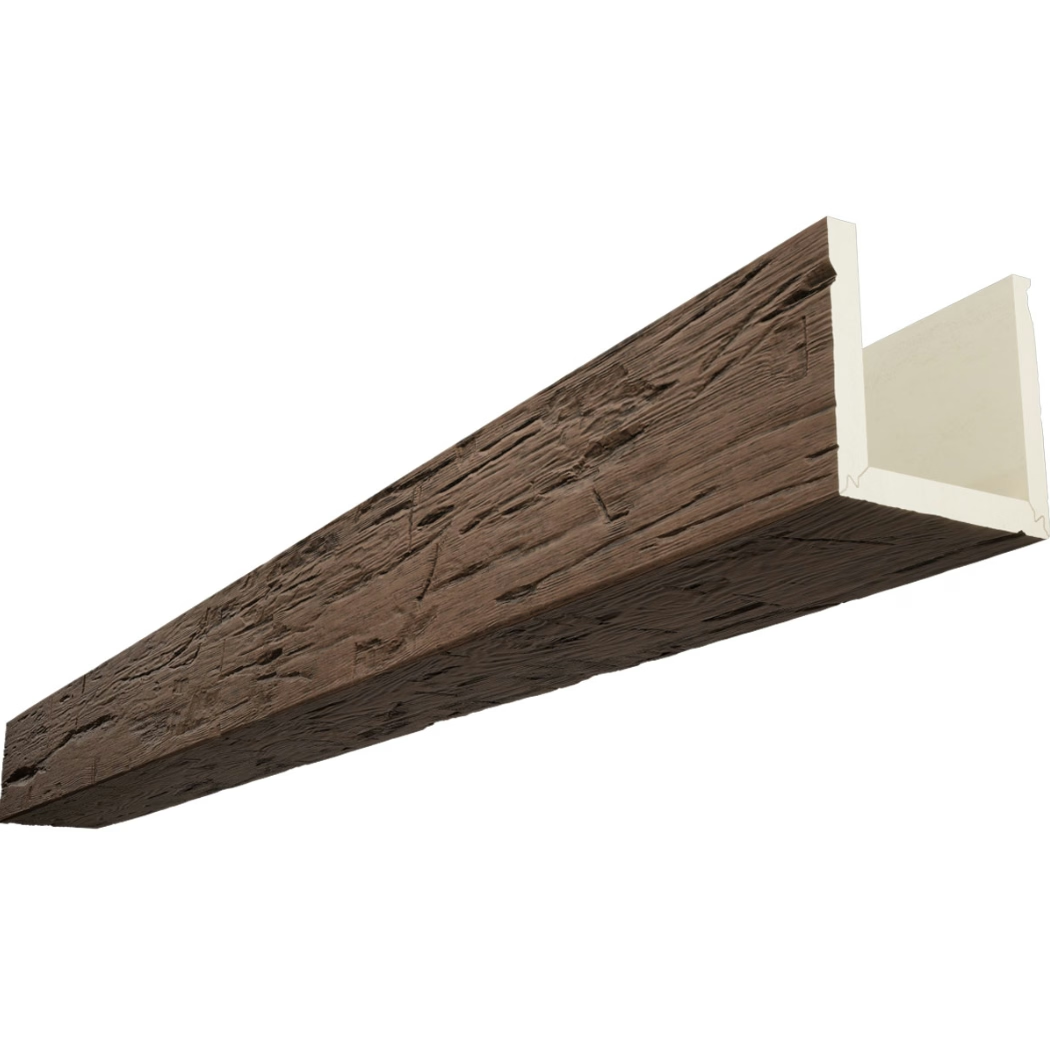
The mounting process begins with installing the structural support rails that will carry the beam weight. These rails, typically made from plywood or engineered wood strips cut to fit between joists, attach using construction screws driven upward into ceiling joists. The rails should be positioned to align with the beam's interior cavity, allowing the beam to slide over them cleanly. A level check during rail installation prevents the frustrating discovery of unlevel beams after adhesive has cured.
With rails in place, the installer marks exact beam positions on the ceiling using a chalk line or straightedge to ensure that parallel beams maintain consistent spacing across the room. This alignment step is the most important factor in achieving a professional appearance, and taking time here pays dividends in the finished result. Misaligned beams catch the eye immediately, while perfectly parallel beams create the impression of architecturally integrated millwork.
The beam itself slides over the mounted rails with a smooth, satisfying motion. Because polyurethane is lightweight, the installer can hold the beam in position with one hand while checking alignment and applying adhesive. Construction adhesive applied to the rail contact surfaces and the beam interior provides the secondary attachment that secures the beam permanently. The adhesive should be applied in a continuous bead along the full length of the rail, not spot applied, to eliminate any possibility of movement or rattling over time.
For beams longer than standard lengths or for installations requiring joins between beam sections, the join should be made at a mounting rail rather than between rails. A mitered joint at the center of a span may separate over time due to the beam's thermal movement, while a joint centered over a rail receives support that prevents shifting. Concealing the joint with a decorative plate or corbel adds visual interest while ensuring structural integrity at the connection point.
Finishing Details That Elevate the Result
The visible connection points and beam ends benefit from attention that transforms a functional installation into a polished design feature. End caps matching the beam's finish profile create clean terminations where beams meet walls, eliminating the rough cut edges that would otherwise be visible. These caps typically attach with adhesive and small finishing nails, then receive a touch-up of stain or paint to blend seamlessly with the surrounding beam surface.
Corner installations present unique challenges that require careful mitering. Internal corners between beams should be cut at 45-degree angles to create clean, tight joints, while external corners require the same treatment for a professional appearance. Practicing cuts on scrap foam material before committing to expensive beam stock builds confidence and helps the installer develop the technique needed for clean mitered joints.
Decorative corbels and plate brackets add authenticity to beam installations, especially in traditional or farmhouse-style settings. These accessories are designed to attach at beam ends or at mid-span support points, creating the impression of structural weight distribution that characterizes genuine timber construction. The visual effect of well-placed corbels substantially upgrades the appearance of what might otherwise read as purely decorative beams, adding perceived craftsmanship to the installation.
Finally, stepping back to evaluate the installation from different viewing angles helps identify any spots that need touch-up attention. Small gaps between beams and ceilings, wall junctions, or between beam sections can be filled with painter's caulk that accepts paint for invisible concealment. This final detailing step takes only minutes but ensures that the result looks intentional and complete rather than hastily installed.
Troubleshooting Common DIY Challenges
Even well-planned installations occasionally encounter challenges that require problem-solving. Beams that arrive with minor surface blemishes from shipping can be repaired with lightweight spackling compound applied and sanded smooth before finishing. The compound takes stain reasonably well for small repairs, though testing on a scrap piece first helps ensure color matching accuracy.
Walls that are not perfectly straight can create gaps at beam ends that require creative concealment. Quarter-round trim in a coordinating finish covers gaps up to about a quarter inch, while larger gaps may require furring strips behind the beam to push it outward for better wall contact. In extreme cases, adding a matching crown molding along the wall-to-beam junction provides both gap coverage and an additional decorative element.
Ceiling irregularities like bumps, waves, or uneven joist alignment can create apparent gaps or misalignment that is actually ceiling-induced rather than installation-induced. In these situations, installing furring strips along the beam route creates a flat, consistent mounting surface that produces straighter beam alignment regardless of underlying ceiling variation. The added thickness of the furring strip is usually invisible once the beam is installed.
The satisfaction of completing a DIY beam installation extends well beyond the final visual result. Homeowners who have navigated the measuring, planning, mounting, and finishing process emerge with skills applicable to countless future projects and with the confidence that comes from successfully managing a project from conception through completion. Lightweight foam faux beams make this achievement accessible to anyone willing to invest a weekend of effort and attention to detail, which is precisely why they have become a cornerstone of the modern DIY renovation toolkit.
Technical References
ASTM standards cited in every specification
Test Data
Lab results from internal testing program
Updated 2026
Reviewed against current product specs


