
When Sarah and Michael purchased their 1980s colonial home in suburban Ohio, they faced a common renovation challenge: dated ceilings that desperately needed updating but couldn't support the weight of real timber beams. The solution came in the form of polyurethane faux wood beams, which transformed their entire first floor without requiring structural reinforcement or professional installation crews.
This transformation story illustrates why PU faux wood beams have become the preferred choice for full-home ceiling renovation projects across residential and commercial spaces. Unlike traditional solid wood or reconstructed timber, polyurethane beams offer significant weight advantages—typically 80% lighter than comparable wood products—while delivering remarkably authentic visual results that fool even experienced contractors.
Understanding Polyurethane Faux Wood Beam Construction
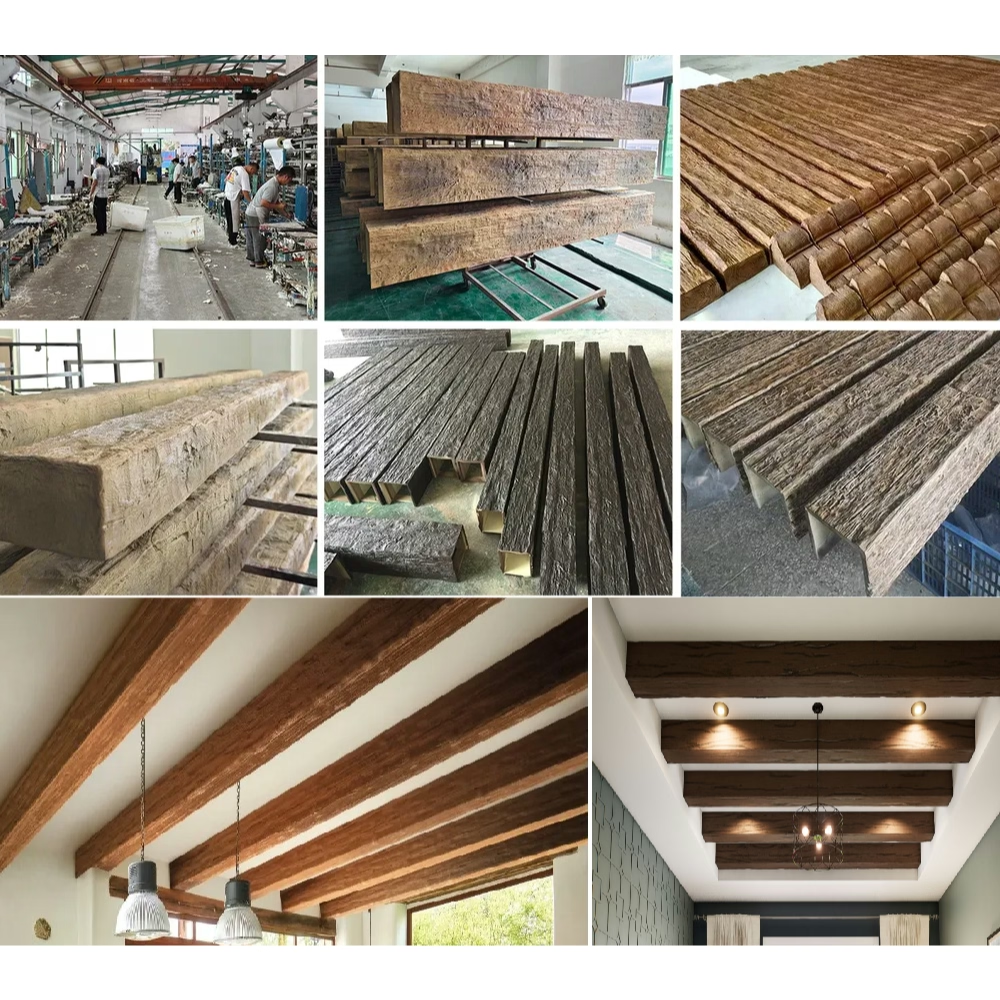
Modern polyurethane faux wood beams represent decades of manufacturing refinement, combining advanced materials science with traditional woodworking aesthetics. The core material consists of high-density polyurethane foam, which receives detailed texturing to replicate natural wood grain patterns, knots, and color variations found in authentic timber.
The manufacturing process begins with carefully selected master molds taken from genuine wood samples. These molds capture every nuance of natural wood texture, including saw marks, weathering patterns, and organic irregularities that give real timber its character. The resulting polyurethane products inherit these authentic details while eliminating the drawbacks associated with harvested wood.
Manufacturers apply multiple finishing layers to achieve realistic color gradients and surface textures. Some premium products incorporate hand-painting techniques where artisans manually apply color variations and weathering effects, creating beams that display the same character inconsistencies found in century-old reclaimed timber. Others utilize automated color-matching systems that ensure consistency across large installations while maintaining natural-looking variation within individual pieces.
The structural integrity of quality polyurethane beams surprises many first-time installers. Modern formulations achieve compression strengths exceeding 300 PSI, allowing these products to function as genuine architectural elements rather than mere decorative trim. This durability proves essential for full-home installations where beams must withstand temperature fluctuations, humidity changes, and occasional contact from occupants moving furniture or performing maintenance.
Planning Your Whole-Home Beam Installation
Successful ceiling renovation requires systematic planning that accounts for architectural features, lighting integration, and overall design coherence. Before purchasing materials, professionals recommend creating detailed room-by-room assessments that identify structural elements, electrical systems, and HVAC ductwork that may influence beam placement.
Measure ceiling heights in each room, noting any variations that might affect visual consistency. Many older homes display significant height differences between rooms due to settling, renovation history, or original construction techniques. Documenting these variations allows you to plan beam heights strategically, using inconsistent ceiling heights as design features rather than obstacles.
Consider the flow between spaces when determining beam orientation and style. Continuous sight lines from living areas to kitchens to hallways create opportunities for dramatic design statements, but they also expose any inconsistencies in beam height, spacing, or finish application. Maintain consistent beam dimensions and spacing throughout connected spaces to establish visual rhythm that guides occupants through your renovated home.
Evaluate existing ceiling fixtures and their relationship to planned beam installations. Can lights, ceiling fans, and decorative light fixtures require integration planning that ensures adequate clearance and proper support. Polyurethane beams accommodate standard mounting hardware when properly reinforced, but recessed lighting often requires careful coordination to achieve clean appearances without visible gaps or awkward positioning.


Cost Analysis for Complete Home Installation
Budgeting for full-home beam installation requires understanding both material costs and associated expenses that affect total project investment. Material pricing varies significantly based on beam style, size, finish quality, and manufacturer reputation, with basic structural beams starting around $30-50 per linear foot while premium artisan-finished pieces command $80-150 per linear foot or more.
For a typical 2,000 square foot home with 8-foot ceilings, material costs for comprehensive beam installation range from $8,000 to $35,000 depending on design complexity and finish selection. This investment typically includes main beams spanning walls, secondary cross beams for visual interest, and decorative accent pieces that enhance architectural authenticity. Exposed beam ceiling styles generally require more material than soffit-based designs where beams tuck against ceiling planes.
Labor costs represent the largest variable in professional installation projects. While DIY installation saves approximately 40-60% compared to contractor rates, the complexity of full-home projects often justifies professional installation. Expect to pay $50-100 per hour for experienced trim carpenters or renovation specialists familiar with faux beam products. A complete home installation typically requires 40-80 labor hours depending on design complexity and existing conditions.
Hidden costs frequently surprise homeowners undertaking comprehensive renovation projects. Electrical modifications to accommodate beam placement, ceiling repair where old fixtures existed, and painting or staining to integrate beams with existing decor add 15-25% to material costs. Budgeting for these contingencies prevents financial stress during installation and allows for quality results that meet original design expectations.
Installation Techniques for Permanent Results
Professional-grade installation ensures your faux beams remain securely attached throughout the life of your home without sagging, separation, or visible mounting hardware. The fundamental principle involves creating structural support that bears weight through the building's framing while concealing connection methods within the beam's profile.
Most installations begin with mounting boards or cleats that attach directly to ceiling joists or rafters. These support structures receive screws driven through the beam's inner surface, with screw locations chosen to align with the beam's natural texture patterns where holes become invisible after installation. Premium manufacturers provide pre-drilled mounting points as part of their installation systems, simplifying the process while ensuring proper weight distribution.
Adhesive application supplements mechanical fasteners for installations where visual appearance demands minimal visible mounting points. Construction-grade polyurethane adhesive creates permanent bonds between beams and mounting surfaces while accommodating the slight thermal expansion and contraction that occurs in all building materials. Apply adhesive in continuous beads along mounting cleats, pressing beams firmly into position and maintaining pressure until initial curing provides stable support.
Corner joints require particular attention to achieve seamless appearance in rooms where beams run continuously between walls. Miter cuts at 45-degree angles create clean corners when properly aligned, but many installers prefer scarf joints where beam ends meet at angles that disguise seam locations within wood grain patterns. Practice cuts on scrap material before committing to finished pieces, as precise alignment separates professional results from amateur attempts.
Maintaining Your Faux Wood Beam Installation
One significant advantage of polyurethane over natural wood involves maintenance requirements that approach zero under normal conditions. Unlike authentic timber that requires periodic refinishing, sealing, or pest treatment, quality polyurethane beams maintain their appearance indefinitely with minimal intervention.
Routine cleaning involves nothing more than dusting with soft cloths or gentle vacuum attachment. The non-porous surface rejects moisture and resists staining from common household substances, eliminating concerns about water damage, mold growth, or food-related discoloration that affect natural wood products. This characteristic proves particularly valuable in kitchens and dining areas where grease particles and cooking residues settle on ceiling surfaces.
Physical damage, while possible, remains unlikely under normal household conditions. Polyurethane resists impact damage better than natural wood, which splits or dents under similar stress. However, sharp objects or significant force can damage beam surfaces, requiring repair techniques that restore appearance without complete replacement. Most minor damage responds well to automotive body filler compounds that accept stain and paint after proper preparation.
Long-term color stability ensures your investment maintains original appearance without the gradual fading that affects stained wood products exposed to sunlight. Quality polyurethane beams incorporate UV inhibitors that resist degradation from solar radiation, though rooms with extensive sun exposure may experience subtle surface chalkiness over decades. Professional refinishing services can restore original appearance when desired, though many homeowners find original finishes remain satisfactory indefinitely.
Design Integration Strategies
Achieving cohesive interior design requires thoughtful integration between beam installations and existing architectural features, furniture selections, and color schemes. The most successful projects treat beams as integral design elements rather than afterthought additions, coordinating their style, scale, and finish with overall aesthetic goals.
Scale relationship between beams and room dimensions dramatically influences perceived space. Large, dramatic beams overwhelm modest rooms while appearing underwhelming in expansive spaces with high ceilings. Match beam proportions to room character—cozy cottages benefit from smaller-scale beams with rustic detailing while modern lofts accommodate bold, geometric profiles that complement contemporary architecture.
Finish selection coordinates beams with surrounding surfaces and furnishings. Dark, richly stained beams create formal atmosphere reminiscent of traditional great rooms and hunting lodges. Lighter finishes evoke coastal, farmhouse, or Scandinavian aesthetics that emphasize airiness and natural light. Unfinished or lightly weathered beams bridge design styles, adapting to various decorating schemes without demanding specific furniture or color selections.
Lighting integration transforms beam installations from static architectural elements into dynamic room features that shift appearance throughout the day and evening. Recessed lighting placed between beams creates layered illumination that emphasizes texture and depth. Uplighting directed at beam undersides produces dramatic shadows that enhance perceived dimension. Pendant fixtures suspended from beams provide task lighting while reinforcing design authenticity through hardware that appears traditional despite modern construction.
Technical References
ASTM standards cited in every specification
Test Data
Lab results from internal testing program
Updated 2026
Reviewed against current product specs


