The problem arrives quietly. A porch overhang that once looked sturdy and characterful develops a sag. A close inspection reveals that one or more rafter tails have softened from moisture, split under a load they were never designed to bear, or simply rotted through after years of exposure. In older homes, the original rafter tails may have been removed decades ago during a renovation that prioritized function over aesthetics, leaving a flat, featureless fascia where warmth and texture once existed. The question that follows is practical: how do you restore that character without the cost, complexity, and ongoing maintenance demands of real timber replacement?
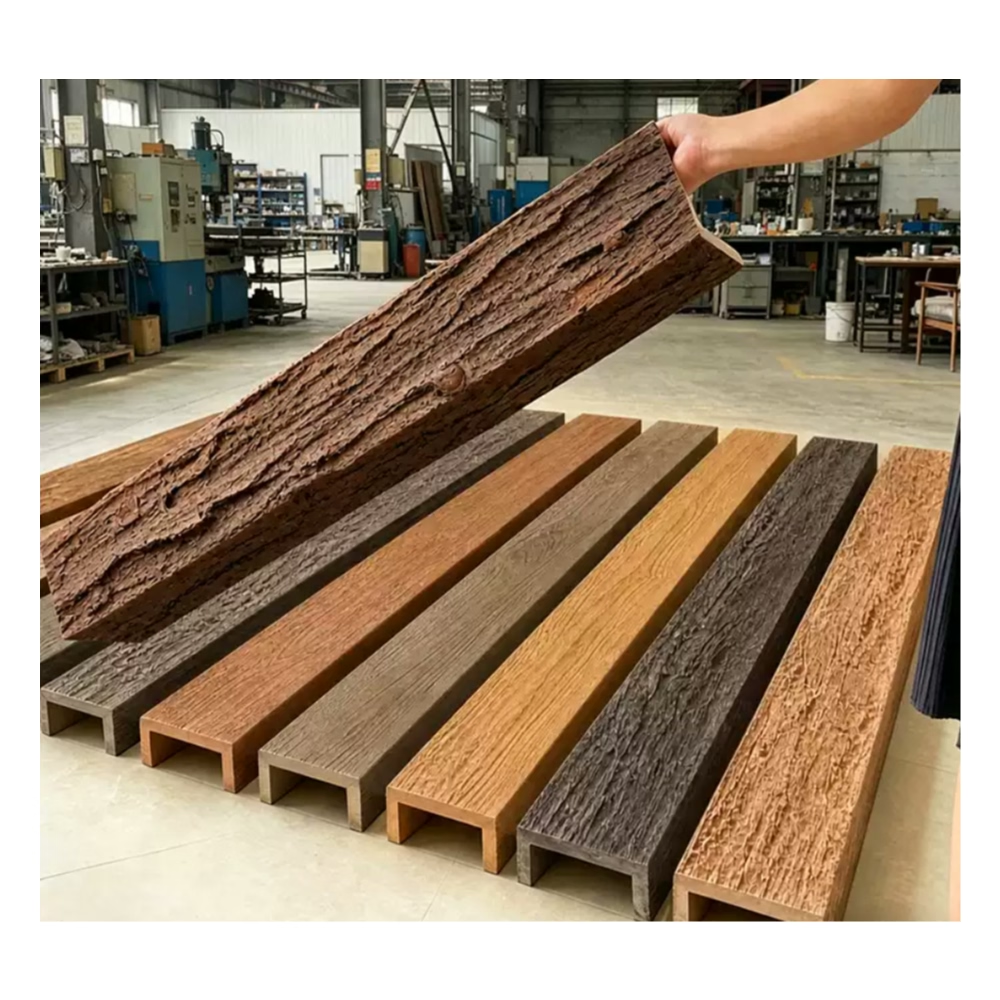
PU resin imitation timber rafter tail decorative replacement parts answer that question directly.
Understanding Why Rafter Tails Deteriorate
Before selecting replacement parts, it helps to understand what typically causes rafter tails to fail. In most cases, the culprit is sustained moisture exposure. When water infiltrates the end grain of a timber rafter tail, it creates conditions favorable for fungal growth that progressively weakens the wood from the inside out. This process can advance for years before becoming visually apparent. Once rot establishes itself in the end grain, the structural integrity of the tail diminishes rapidly.
In some climates, insect activity compounds the problem. Carpenter bees and wood-boring beetles target exposed timber ends, creating channels through the wood that accelerate deterioration. Termites, while more commonly associated with structural framing, can also colonize rafter tails in severe infestations.
Mechanical damage is another common cause of failure. Impact from falling tree limbs, wind-driven debris, or accidental contact during maintenance work can split or crack rafter tails. Once the protective bark or outer surface is compromised, the underlying wood becomes vulnerable to all of the moisture and biological threats described above.
Finally, some rafter tails are simply lost to renovation decisions. A mid-twentieth-century remodeling that enclosed a porch or added a drop ceiling may have removed original rafter tails as part of the process. The structure remains sound, but the character has been erased.
The Case for PU Resin Over Timber Replacements
The traditional approach to replacing deteriorated rafter tails involves cutting new lumber to match the existing profile, treating it with preservatives, and fastening it in place. This method works, but it carries meaningful limitations. The new timber must be sized, shaped, and finished to match the original, which can require custom milling. It then needs to be painted or stained and will require ongoing maintenance identical to the original piece it replaced.
PU resin imitation replacement parts sidestep each of these challenges. Because they are manufactured from a mold taken from an original or designed profile, the shape of the decorative portion is consistent and accurate. The material itself is dimensionally stable, meaning it will not shrink, swell, or twist as humidity and temperature fluctuate. The factory-applied finish, whether it mimics natural wood grain or a solid color, is formulated to resist UV degradation and moisture absorption.
For homeowners dealing with a long run of damaged rafter tails along a fascia, the weight savings are transformative. Replacing a dozen real wood rafter tails might require scaffolding, multiple workers, and careful load management. Installing PU resin replacements can often be accomplished by a single person working from a ladder, with each piece light enough to position and secure without assistance.


Matching Style to Architectural Context
Replacement parts are only as effective as their appropriateness to the building they are installed on. A Craftsman bungalow with exposed rafter tails expects a specific profile: wide, often curved or bracket-shaped, with proportions that reflect the Arts and Crafts emphasis on honest craftsmanship. Installing slim, squared-off rafter tails on that same building would look incongruous, regardless of how well they were made.
Manufacturers of quality PU resin trim parts typically maintain libraries of profiles that correspond to common architectural styles. These range from the simple, unadorned squared tails common in vernacular farmhouse construction to the more elaborate corbelled tails found in Georgian and Colonial architecture. Some suppliers also offer custom tooling services for projects with unique requirements, such as restorations of historically significant buildings where the original rafter tail profile must be documented and replicated precisely.
When evaluating replacement parts, pay attention to the projection length, which is the distance the tail extends beyond the fascia plane. If the projection is too short, the replacement will look undersized and underwhelming. If it extends too far, it may interfere with water drainage or create clearance issues. Measure the existing tails or review architectural drawings to determine the correct projection before ordering.
Installation Approaches for Different Scenarios
The installation approach depends on whether the structural rafter behind the fascia is intact and accessible. In new construction or complete renovation projects where the structural rafters are exposed, replacement tails can be applied directly to the rafter ends using construction adhesive supplemented by screws driven through predrilled pilot holes. The screws provide immediate holding strength while the adhesive cures and creates a permanent bond.
In situations where the rafter ends are concealed behind sheathing or fascia material, the replacement tails must be mounted to the fascia surface itself. This is a surface-mounting scenario that requires careful attention to the gap between the replacement part and the underlying structure. Any voids should be filled with a compatible adhesive or foam backer rod to prevent the part from flexing under wind load or impact.
For complete coverage of an existing flat fascia where no rafter tails were ever present, some installers create a mock rafter tail system using a combination of PU resin tails and a matching trim board that runs along the fascia face. This approach allows a completely flat surface to be transformed into one that appears to feature exposed rafter framing, adding significant architectural depth and visual interest.
Long-Term Performance and Value
The value proposition of PU resin imitation replacement parts extends well beyond the initial installation. Over a twenty-year horizon, the cost differential between these parts and real timber replacements typically favors the PU resin option when maintenance costs are factored in. Real timber requires periodic inspection, repainting or resealing, and occasional repair or replacement as individual pieces fail. PU resin parts require none of this, provided they are installed correctly and not subjected to unusual mechanical stress.
For commercial property managers overseeing multiple buildings, this reliability translates directly into reduced maintenance budgets and fewer service calls. The consistency of appearance over time also matters for properties with brand standards or aesthetic guidelines that require exterior elements to maintain a uniform appearance. PU resin parts will weather uniformly, without the patchy deterioration that can occur across a mixed-age timber replacement run.
When specifying these parts for larger projects, engage the supplier early in the design process to confirm availability, lead times, and any tooling requirements. Proactive communication at this stage prevents delays during construction and ensures that the replacement parts will integrate smoothly with other exterior finishes and trim elements.
Technical References
ASTM standards cited in every specification
Test Data
Lab results from internal testing program
Updated 2026
Reviewed against current product specs


