
The Kitchen Ceiling Is Often the Forgotten Element
Kitchens get a lot of design attention: the cabinets, the counters, the backsplash, the flooring, the lighting. The ceiling is usually the last thing considered, and in a rustic kitchen, that is a mistake. A rustic kitchen depends on the ceiling for its architectural character, and a flat white plane undermines every other design decision in the room.
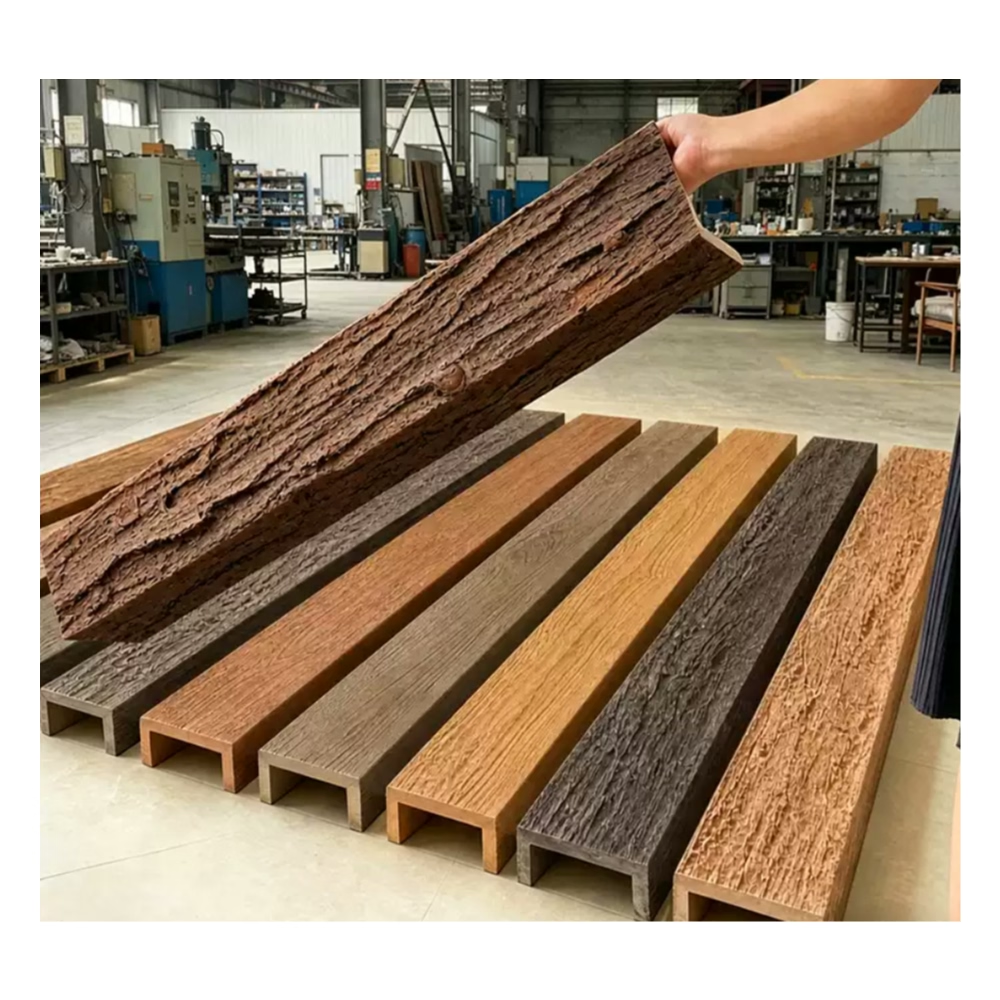
Faux timber ceiling beams fix this. The beams add texture, material, and visual weight to a ceiling that would otherwise feel flat, and the rustic finish coordinates with the farmhouse aesthetic that defines the room. The result is a kitchen ceiling that belongs with the room rather than fighting against it.
For designers, the beam layout is one of the first decisions in the kitchen design, not the last. The beams determine the ceiling's visual hierarchy, they coordinate with the lighting plan, and they set the tone for everything that follows.
Layout Choices for Kitchen Ceilings
Kitchen ceiling layouts are usually determined by the room's geometry, the ceiling height, and the relationship to adjacent spaces. A few configurations work particularly well in rustic kitchens:
- Parallel beams over the main kitchen area. This is the most common kitchen layout. Two to four beams run across the ceiling, aligned with the room's major sight lines. The beams define the kitchen area and give the ceiling visual weight.
- A single beam over the kitchen island. This is a popular detail for kitchens with high ceilings or open plans. The beam runs perpendicular to the island and becomes the kitchen's focal point. Pendant lights hang from the beam over the island.
- Beams that continue from the kitchen to an adjacent living area. For open-plan kitchens, the continuous beam run unifies the spaces and gives the ceiling a consistent architectural language. The transition between kitchen and living area is marked by the same beam run.
- Beams in an L-shape around the kitchen perimeter. This configuration works in L-shaped kitchens or in kitchens with a distinct cooking zone and dining zone. The beams frame the kitchen without filling the entire ceiling.
For flat ceilings, parallel beams are the standard configuration. For vaulted or sloped ceilings, beams run perpendicular to the ridge or the slope. The angles are pre-cut in the factory, and the layout should be specified with the ceiling geometry in mind.
Sizing for Kitchen Proportions
Kitchen ceiling heights in rustic projects range from 2.4 meters in older cottage kitchens to 3 meters or more in larger farmhouse kitchens. The beam proportion needs to match the height.
For 2.4-meter ceilings, beams in the 150 to 200 millimeter range work. For 2.7-meter ceilings, beams in the 175 to 225 millimeter range suit the scale. For 3-meter ceilings, beams in the 200 to 250 millimeter range work. The width should match or exceed the height, and the proportions should feel grounded rather than tentative.
For kitchens with a kitchen island, a single statement beam over the island is usually a slightly heavier profile than the beams on the rest of the ceiling. The heavier profile gives the island a clear focal point and balances the visual weight of the cabinets and counters below.
Finishes That Work With Kitchen Materials
Rustic kitchen finishes coordinate with the room's dominant materials — cabinets, counters, backsplash, flooring. A few directions work particularly well:
- Honey pine and warm oak suit kitchens with painted cabinets in white, gray, or navy. The warm beam tone contrasts with the cool cabinet color and grounds the room.
- Reclaimed barnwood suits kitchens with wood cabinets, stone counters, and natural-fiber flooring. The reclaimed finish ties the wood elements together.
- Weathered gray and driftwood suit kitchens with white cabinets, white counters, and a subway tile backsplash. The neutral beam tone keeps the room bright and fresh.
- Soft walnut suits kitchens with dark painted cabinets or dark-stained cabinets. The mid-tone beam provides visual warmth without going too light.
The beam finish should be coordinated with the floor finish. A honey pine beam with a honey pine floor reads as one wood family. A honey pine beam with a darker walnut floor reads as two different intentions, and the mismatch is noticeable in a kitchen where the floor is a large visible surface.

The Range Hood Relationship
The range hood is the kitchen's visual center, and the beam layout should coordinate with it. The most common configurations:
- Beams that terminate at the range hood. The beams run perpendicular to the hood and end at the hood surround. The relationship reads as intentional, and the hood becomes part of the beam layout.
- Beams that pass over the range hood. The beams run continuously over the hood, with the hood below the beam line. This works in kitchens where the hood is a recessive feature and the beams are the dominant visual.
- A single beam above the range hood, perpendicular to the parallel run. This configuration works in kitchens with a narrower parallel run. The single beam above the hood marks the cooking zone and gives the hood a visual frame.
For range hoods in a different material — copper, stainless steel, or painted steel — the beam should be in a complementary tone. A copper hood pairs with a honey pine beam. A stainless steel hood pairs with a weathered gray or driftwood beam. A painted steel hood can work with any beam tone, depending on the paint color.
Pendant Lights and the Island
Rust
ic kitchens with an island almost always include pendant lights, and the beam over the island carries some of those pendants. The configuration depends on the island size and the pendant style:
- Two pendants over a standard 180-centimeter island. The pendants hang from the island beam at equal spacing, with the center of the island as the midpoint between them.
- Three pendants over a longer island. The pendants are evenly spaced along the island beam, with the middle pendant centered on the island.
- A single oversized pendant over a narrow island. The single pendant provides task light without cluttering the ceiling, and the scale of the fixture balances the island below.
The pendants should be on a separate dimmer circuit from the recessed lights. The kitchen needs to shift from bright task lighting during cooking to soft ambient lighting during dinner, and the separate circuits make that shift possible.
Working With Open Shelving
Rustic kitchens often include open shelving, and the beam should coordinate with the shelving. The most common configuration is a beam that runs perpendicular to the shelving wall, with the shelving mounted between the beams or against the wall below the beams.
For shelving in a different material from the beams — painted shelves versus natural wood beams, or glass shelves versus reclaimed beams — the relationship should be intentional. A painted white shelf below a honey pine beam reads as a deliberate contrast. A natural wood shelf below a honey pine beam reads as a continuation of the same material.
For shelving that is the same wood family as the beams, the tone should be slightly different to avoid blending. A medium oak beam with a light oak shelf reads as two distinct elements. A medium oak beam with a medium oak shelf reads as one continuous surface, which can look flat.
The Practical Considerations
Kitchens are functional spaces, and the beam specification needs to account for the kitchen's practical requirements:
- Ventilation and range hood clearance. Beams should not be placed directly above the range hood in a way that interferes with the hood's airflow. The minimum clearance varies by hood model, and the beam layout should be coordinated with the hood specification.
- Recessed lighting placement. Recessed lights should be placed between beams rather than under them. Where a recessed light must be under a beam, the fixture is moved slightly or the beam is notched on site.
- Cabinet height. In kitchens with tall cabinets that reach the ceiling, the beams should be coordinated with the cabinet height. A beam that runs into the top of a cabinet at an awkward angle looks unfinished, while a beam that terminates cleanly above the cabinet looks intentional.
- Ceiling fan and general lighting. If the kitchen has a ceiling fan or a general lighting fixture, the blocking should be installed in the ceiling before the beams go up. The fixture is supported by the blocking, not the beam.
Install Notes for Kitchen Projects
Kitchen beam installs are usually done after the cabinets, counters, and flooring are in place. The beams install from a ladder or scaffold, and the crew needs clearance around the perimeter of the room to work safely.
The total install for a standard rustic kitchen is one to two days. The first day covers the main beam run, and the second day covers any island beam, touch-ups, and coordination with the pendant lights.
The pendant light wiring should be roughed in before the beams go up, with the wires run to the beam locations and coiled above the ceiling. When the beam is installed, the wire is pulled down through a small hole in the top of the beam and connected to the pendant. This is the cleanest configuration and avoids surface-mounted wiring.
The Result
A rustic kitchen with the right faux timber ceiling beams is a kitchen that feels whole. The beams tie the room together, they coordinate with the cabinets and the counters, and they give the ceiling the visual weight the rustic aesthetic requires. For designers, the beams are one of the most reliable design tools available. For contractors, the install is straightforward and the result is something the homeowner appreciates every time they walk into the room.
Frequently Asked Questions About Rustic Kitchen Ceiling Beams
What beam layout works best over a kitchen island?
A single statement beam running perpendicular to the island creates the strongest focal point. Position it centered over the island's length, sized slightly heavier than surrounding beams (8x8 or larger if main beams are 6x6). Hang 2-3 pendant lights from this beam at even spacing. This configuration defines the island as the kitchen's social center while providing task lighting exactly where needed.
Should kitchen beams match the cabinet wood or contrast with it?
Contrast usually works better. White or painted cabinets pair beautifully with warm honey pine or oak beams, creating visual warmth against cool cabinetry. If cabinets are natural wood, choose beam tones slightly lighter or darker to prevent blending. Matching wood families (oak beams with oak cabinets) requires intentional tone differentiation—medium oak cabinets with light oak beams maintains distinction.
How do you coordinate beams with range hoods?
Three approaches work: (1) Beams terminate at the hood surround, creating intentional framing; (2) Beams pass continuously over the hood when it's a recessive element; (3) A single perpendicular beam above the hood marks the cooking zone. For copper or stainless hoods, coordinate beam tones—copper pairs with honey pine, stainless with weathered gray or driftwood.
What ceiling height is minimum for kitchen beams?
Standard 8-foot (2.4m) ceilings work well with 4x6 or 6x6 beams. For 9-foot ceilings, use 6x6 to 8x8 profiles. Higher 10+ foot ceilings need 8x8 or larger for proportional presence. Beams should feel grounded without overwhelming—profile depth of 6-8 inches suits most residential kitchens beautifully.
Can beams accommodate recessed lighting and ventilation?
Yes, with proper planning. Place recessed lights between beams rather than under them. Coordinate beam layout with range hood clearance requirements—beams shouldn't interfere with hood airflow. Wire pendant lights before beam installation by roughing in wiring above the ceiling, then pulling through small holes in beam tops during installation. This creates clean, integrated lighting.
How long does kitchen beam installation take?
Standard rustic kitchen installation completes in 1-2 days. Day one covers main parallel beam runs; day two handles island beams, touch-ups, and pendant light coordination. Work happens after cabinets, counters, and flooring are installed. Adhesive mounting with supplementary fasteners provides secure attachment over finished surfaces.
What finish works with open shelving in kitchens?
Coordinate beam and shelf materials intentionally. Painted white shelves below natural wood beams create deliberate contrast. Natural wood shelves below wood beams need slight tone variation to avoid blending—light oak shelves with medium oak beams maintains visual separation. Glass or metal shelving works with any beam tone, adding modern contrast to rustic warmth.
Should beams extend into adjacent open-plan spaces?
Yes, for visual continuity. Beams continuing from kitchen into living areas unify open-plan layouts and establish consistent architectural language. The beam run marks spatial transitions without walls while maintaining ceiling rhythm. This creates cohesive flow perfect for modern farmhouse and rustic contemporary designs.
Do faux beams handle kitchen moisture and temperature?
Polyurethane beams excel in kitchen environments. They're inherently moisture-resistant, won't warp from humidity or temperature cycling, and resist grease accumulation better than real wood. Factory-applied finishes provide durable protection that maintains appearance for decades without refinishing—perfect for demanding kitchen conditions where cooking creates heat, steam, and airborne oils.
Technical References
ASTM standards cited in every specification
Test Data
Lab results from internal testing program
Updated 2026
Reviewed against current product specs

